
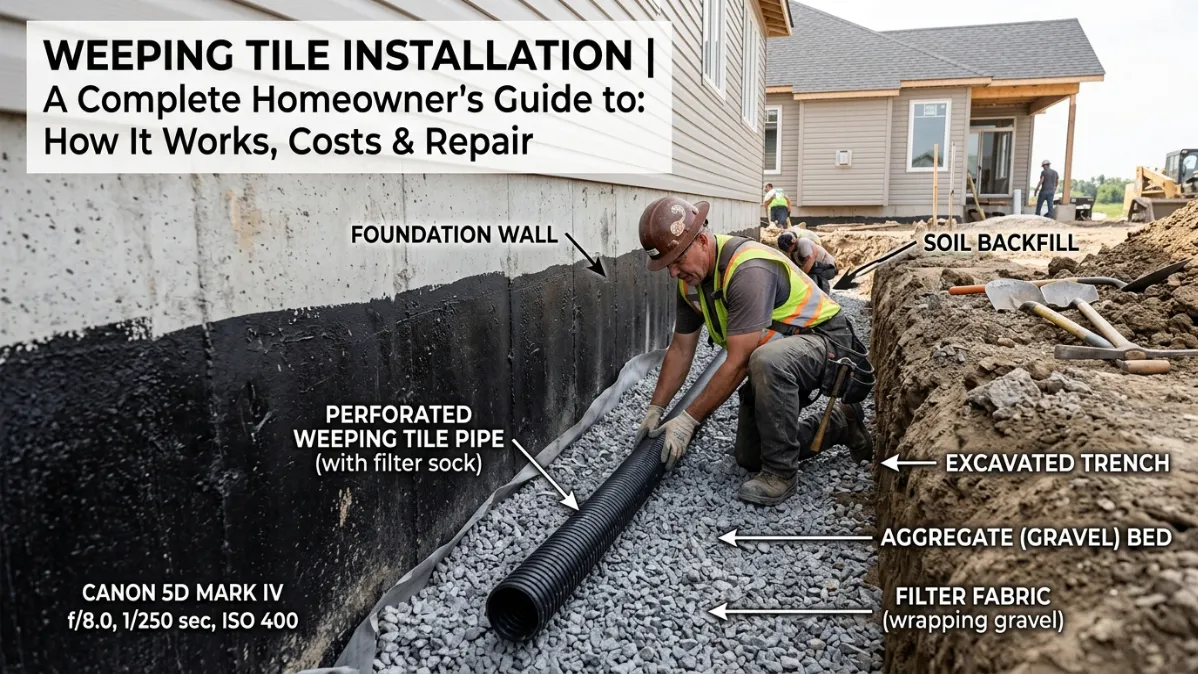
If your basement floods after heavy rain, your foundation backfill stays soggy, or water keeps seeping in along the floor, weeping tile installation is one of the most effective long-term solutions you can put in place. Weeping tile installation is the process of placing a perforated drainage pipe around or beneath your foundation to collect groundwater and carry it safely away before it can build pressure and force its way inside. Despite the old-fashioned name, there is no clay tile involved in a modern system, and there is nothing weak about it. Done correctly, it is the backbone of a dry basement, and it is the same core technology professional waterproofing technicians rely on across the NY metro. This guide explains what weeping tile is, how the system works, how installation actually happens on exterior and interior jobs, what it costs, and how to handle a weeping tile that has failed.
Long Island Homeowners Trust Mold Removal Experts for Free Inspections and Proven Solutions That Get Rid of Moisture for Good!
What Is Weeping Tile?
Understanding what is weeping tile starts with the name, which is a piece of plumbing history. The original systems used short lengths of clay or terracotta pipe laid end to end with small gaps between them. Groundwater “wept” in through those gaps and was carried away, and the name stuck. Today the clay is long gone. A modern weeping tile is a continuous perforated pipe, usually corrugated high-density polyethylene or rigid perforated PVC, with small holes or slots along its length that let water enter while the pipe channels it toward a discharge point.
So weeping tile is simply a subsurface drainage pipe. You will hear it called several other names depending on the region and the trade: drain tile, footing drain, perimeter drain, and, in many contexts, a french drain. The terms overlap heavily, and the differences are mostly about where the pipe sits and what it connects to. What matters is the job. The pipe collects water from the soil around your foundation and gives that water an easy path away from your home, instead of letting it pool against the wall.
How a Weeping Tile System Works
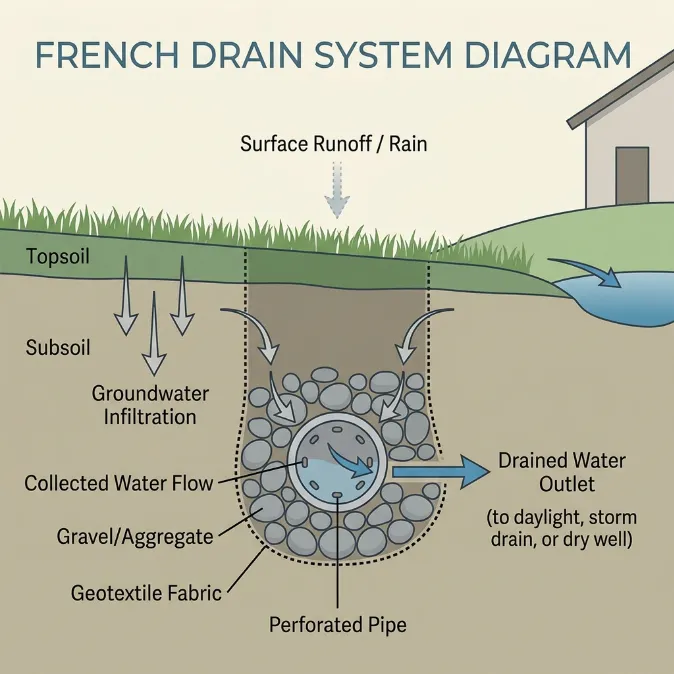
A weeping tile system works on the same principle as every good drainage solution: stop fighting water and give it a guided exit. Soil around a foundation holds moisture, and during heavy rain or snowmelt that moisture turns into hydrostatic pressure, the force that pushes water through cracks, joints, and porous concrete. The weeping tile sits at the lowest point of the foundation, surrounded by washed gravel, so water in the soil naturally drains down into the gravel, enters the perforated pipe, and flows by gravity to a discharge point.
That discharge point is critical, because the pipe only relocates water, it does not make it disappear. The water leaves through one of three routes: daylighting to a lower point on a sloped lot, a connection to a municipal storm system where local code permits it, or, most commonly on flat lots, a sump pit where a pump lifts the water and discharges it outside and away from the house. A complete weeping tile system is therefore three parts working together: the perforated pipe, the gravel and filter fabric that keep it from clogging, and the discharge that gives the water somewhere to go. Weaken any one of the three and the whole system underperforms.
The Benefits of Professional Weeping Tile Installation
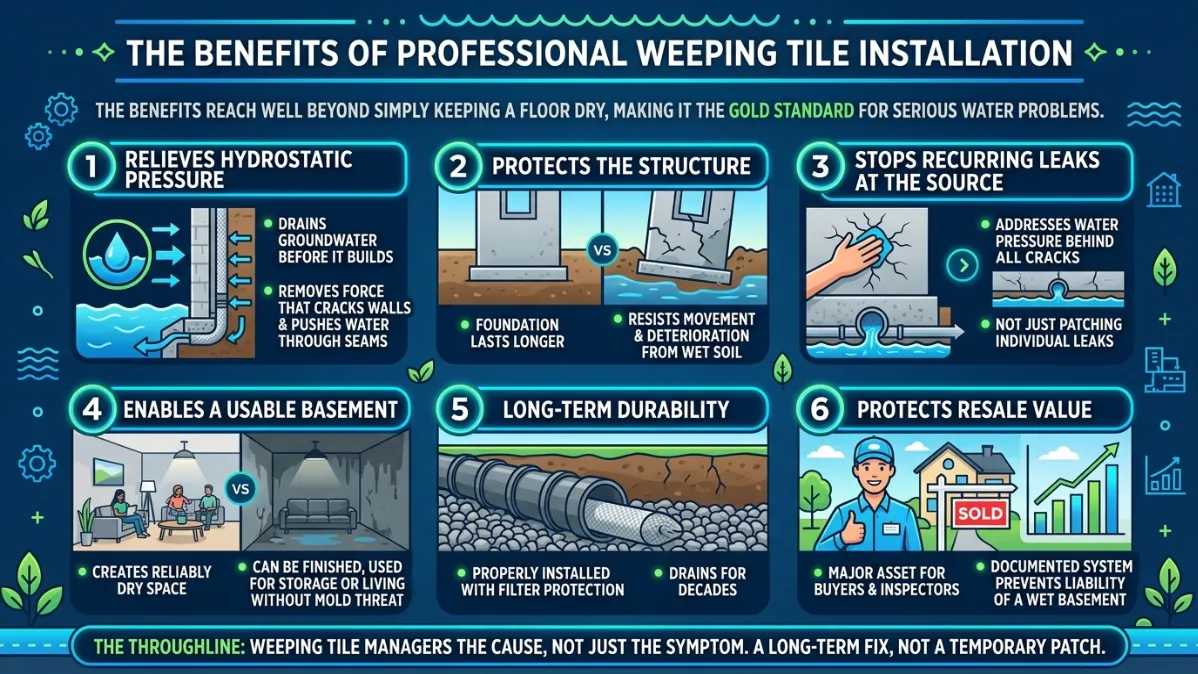
The benefits of professional weeping tile installation reach well beyond simply keeping a floor dry, which is why it remains the gold standard for serious water problems.
- It relieves hydrostatic pressure. By draining groundwater away before it can build, the system removes the force that cracks walls and pushes water through seams.
- It protects the structure. A foundation that is not constantly saturated lasts longer and resists the movement and deterioration that wet soil causes.
- It stops recurring leaks at the source. Rather than patching individual cracks, weeping tile addresses the water pressure behind all of them at once.
- It enables a usable basement. A reliably dry basement can be finished, used for storage, or counted as living space without the constant threat of water damage and mold.
- It is durable. A properly installed system with the right filter protection can drain for decades.
- It protects resale value. Buyers and inspectors treat a documented drainage system as a major asset, and a wet basement as a major liability.
The throughline is that weeping tile manages the cause of basement water, not just the symptom. That is what makes it a long-term fix instead of a temporary patch.
Exterior vs Interior Weeping Tile Installation
Weeping tile is installed in two very different ways, and knowing which one fits your situation is the heart of the decision.
Exterior Weeping Tile Installation
Exterior installation places the pipe outside the foundation, at the level of the footing, where it intercepts groundwater before it ever reaches the wall. The crew excavates down to the footing around the affected area, cleans and inspects the wall, and typically applies a waterproofing membrane and a dimple board to protect it. A bed of washed gravel goes in, the perforated pipe is laid at footing level and sloped toward the discharge, more washed stone covers it, and filter fabric helps keep silt out. The trench is then backfilled. This is the most thorough approach because it stops water on the outside, but it is also the most invasive and expensive, since it requires excavating around the foundation and disturbing landscaping, walkways, and anything else in the way. It is most practical during new construction or a planned full exterior waterproofing project.
Interior Weeping Tile Installation
Interior weeping tile installation places the pipe beneath the basement floor, along the inside perimeter. The crew breaks out a channel in the concrete slab around the edge of the basement, digs a trench, lays gravel and perforated pipe sloped toward a sump pit, installs the sump pit and pump, covers the pipe with stone, and pours fresh concrete over it. Water that reaches the base of the wall drops into the system and is carried to the sump, which pumps it out. This weeping tile drainage system is the most common retrofit for existing homes, because it avoids excavating the exterior and can be installed in almost any weather. It accepts that an older wall may always let in some water and simply gives that water a clean, controlled route to the pump. For most homeowners with an existing wet basement, interior installation is the more realistic and affordable path.
Why the Right Weeping Tile Installation Is the Best Option for a Wet Basement
For a chronically wet basement, weeping tile installation is the best option in most cases because it solves the problem at its root rather than masking it. Surface sealers and crack injections treat individual symptoms and fail the moment new pressure finds a new path. Weeping tile lowers the pressure across the entire foundation, so the water no longer has the force to push inside anywhere. The best choice between exterior and interior comes down to your specific situation: exterior is ideal when the foundation is already being excavated or when the wall itself needs waterproofing, while interior is usually the smarter, less invasive option for retrofitting an existing home. A contractor who assesses your soil, water table, discharge options, and the condition of your foundation before recommending one approach is giving you a real answer, not a default sales pitch.
The Weeping Tile Installation Process Step by Step
A properly installed weeping tile system protects your foundation by collecting groundwater and directing it away before it can create pressure against basement walls. Whether the project involves an exterior drainage system or an interior basement waterproofing solution, the installation process follows the same basic principles. Each step plays an important role in ensuring the system performs reliably for decades.
Step 1: Assess the Water Problem
The process begins with a detailed inspection of the property. Contractors identify where water is entering, evaluate soil conditions, determine the groundwater level, and establish the best discharge location. Proper planning helps prevent drainage failures and ensures the system complies with local building requirements.
Step 2: Excavate to Access the Foundation
The next step is excavation. For exterior systems, contractors dig down to the foundation footing around the perimeter of the home. For interior systems, a section of the basement floor is removed along the foundation walls to create a trench for the drainage system.
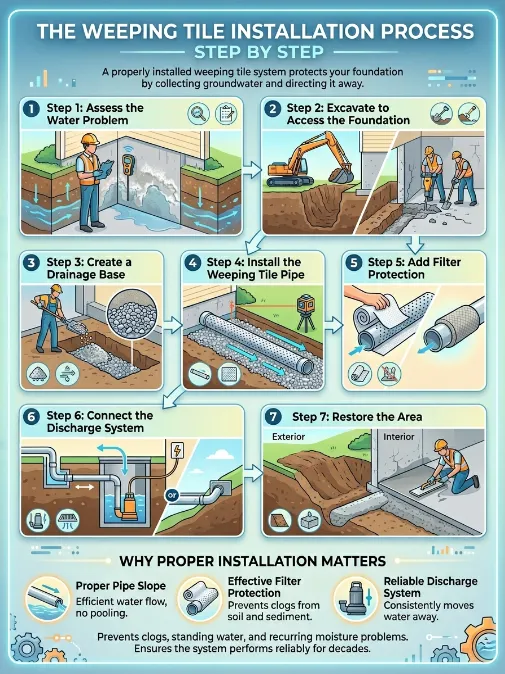
Step 3: Create a Drainage Base
A layer of clean, washed gravel is installed in the trench. This gravel allows groundwater to move freely toward the drainage pipe while preventing soil from restricting water flow.
Step 4: Install the Weeping Tile Pipe
The perforated drainage pipe is placed on the gravel bed and carefully sloped toward the discharge point. A consistent slope is essential because it allows collected water to flow efficiently through the system without pooling inside the pipe.
Step 5: Add Filter Protection
The pipe is wrapped in filter fabric or protected with a filter sock. This barrier prevents soil, sediment, and other debris from entering the perforations and clogging the system over time.
Step 6: Connect the Discharge System
The drainage pipe is connected to an approved discharge point. Depending on site conditions, this may be a daylight outlet, storm drainage connection, or sump pit equipped with a sump pump. The discharge system must be capable of moving water away from the foundation consistently.
Step 7: Restore the Area
Once the drainage system is tested, the trench is restored. Exterior installations are backfilled with appropriate materials, while interior systems are covered with fresh concrete to restore the basement floor.
Why Proper Installation Matters
The difference between a drainage system that lasts for decades and one that fails prematurely often comes down to three factors: proper pipe slope, effective filter protection, and a reliable discharge system. Mistakes in any of these areas can lead to clogs, standing water, and recurring basement moisture problems.
Who Handles Broken Weeping Tile Repair in Long Island?
Broken weeping tile repair is typically handled by foundation waterproofing contractors, basement waterproofing specialists, and drainage system experts. These professionals have the equipment needed to inspect underground drainage systems, locate damaged sections, and perform repairs or replacements without unnecessary excavation.
In Long Island, homeowners experiencing basement leaks, recurring water intrusion, musty odors, or foundation moisture problems should contact a contractor with experience in foundation drainage systems rather than a general handyman. Many companies use camera inspections to identify crushed pipes, root intrusion, sediment buildup, disconnected sections, or collapsed drainage lines before recommending repairs.
Mold Removal Experts provides professional weeping tile installation, repair, and replacement services throughout Long Island, Queens, Brooklyn, and The Bronx. Their team diagnoses drainage failures, identifies the source of foundation water problems, and recommends solutions designed to keep basements and crawl spaces dry for the long term.
Depending on the condition of the system, repairs may involve cleaning clogged pipes, replacing damaged sections, correcting drainage slopes, upgrading discharge lines, or installing a completely new weeping tile system. A professional evaluation helps determine the most cost-effective solution while protecting the home from future water damage.
Weeping Tile Installation Cost
Cost varies widely with the type of installation and the size of the home, so treat these as planning ranges rather than quotes. An interior weeping tile system retrofit commonly runs from several thousand dollars up to the mid-five figures, driven mainly by the linear footage of foundation, the number of sump pumps needed, and the condition of the basement.
Exterior installation costs significantly more, often well into the five figures, because of the excavation, the waterproofing and dimple board applied to the wall, and the restoration of everything disturbed around the foundation. Repairs to an existing system, such as clearing a clog or replacing a section, cost far less than a full installation. The real number depends on access, depth, soil, discharge distance, and whether the work is interior or exterior, which is why an on-site assessment is the only way to get an accurate figure.
NY Metro Considerations: Water Table, Soil, and Code
Local conditions shape the right design. Parts of Long Island sit on a seasonal high water table, where steady groundwater makes a reliable weeping tile and sump system essential rather than optional. Dense clay soils in other areas drain slowly and keep pressure against foundations longer, which also favors a robust drainage system over surface fixes. Local codes govern where discharge water can go, and many municipalities prohibit routing sump or drainage water into the sanitary sewer, so the discharge has to be designed to comply. Freeze is another local factor, since an exterior discharge line that freezes in winter can back the whole system up. A contractor who works in your municipality designs around these realities instead of discovering them after the dig.
Weeping Tile Installation: Final Thoughts
The enduring value of weeping tile installation comes from the fact that it treats the cause of a wet basement rather than the symptoms. Instead of patching one crack at a time, it lowers the water pressure against the entire foundation by giving groundwater an easy, guided path to a sump or a discharge point. Whether the system goes on the outside of the footing or beneath the basement floor, the same three things decide whether it lasts: a proper slope, filter protection that keeps the pipe clear, and a discharge that actually carries water away.
Skip any of them and even a new system disappoints, which is why this is rarely a do-it-yourself project. If your basement keeps taking on water, the smartest first move is an on-site assessment of your soil, water table, and discharge options, because that is what determines the right weeping tile installation for your home. Our team can trace where your water is going and recommend the system that will keep your basement dry for the long haul.
Frequently Asked Questions About Weeping Tile Installation:
What does weeping tile do?
Weeping tile collects groundwater around a foundation and directs it away from the home before water can build up against basement walls. By relieving hydrostatic pressure, it helps prevent leaks, flooding, foundation damage, and moisture problems in below-grade spaces.
Where is weeping tile installed?
Weeping tile is typically installed alongside the foundation footing, below basement floor level. Exterior systems sit outside the foundation wall, while interior systems are installed beneath the basement slab along the perimeter of the foundation.
Does every house have weeping tile?
Not every home has weeping tile. Older homes may have been built before foundation drainage systems became common, and some properties rely on other drainage methods. Many modern building codes require foundation drainage for homes with basements.
Can weeping tile get clogged?
Yes. Weeping tile can become clogged by soil, sediment, tree roots, iron ochre bacteria, or debris entering the system. Clogged pipes reduce drainage performance and can lead to water intrusion, basement flooding, and increased pressure against foundation walls.
What is the difference between interior and exterior weeping tile?
Exterior weeping tile is installed outside the foundation at the footing level to intercept groundwater before it reaches the wall. Interior weeping tile is installed beneath the basement floor and captures water that enters around the foundation, directing it to a sump pump for removal.
Does weeping tile need a sump pump?
Many interior weeping tile systems rely on a sump pump to remove collected water from the home. Exterior systems may drain by gravity if site conditions allow, but homes with flat lots or high groundwater levels often require a sump pump for effective drainage.
How much maintenance does weeping tile require?
Most modern weeping tile systems require little routine maintenance, but periodic inspections are recommended. Homeowners should ensure discharge lines remain clear, sump pumps operate correctly, and any signs of drainage problems are addressed before water damage occurs.
Can tree roots damage weeping tile?
Yes. Tree roots naturally seek moisture and can enter damaged joints, cracks, or openings in drainage pipes. Once inside, roots can expand and restrict water flow, eventually causing backups, poor drainage, and foundation water issues.
Will weeping tile stop basement flooding completely?
Weeping tile significantly reduces the risk of basement flooding by managing groundwater around the foundation. However, severe storms, sump pump failures, blocked discharge lines, or drainage issues elsewhere on the property can still allow water to enter the basement.
How is weeping tile inspected?
Drainage contractors often use specialized camera equipment to inspect weeping tile systems. A camera inspection can identify clogs, root intrusion, crushed sections, standing water, or disconnected pipes, helping determine whether cleaning, repair, or replacement is necessary.