Three fixes. Three very different prices. One honest guide to help you stop paying for the wrong solution, and understand what’s happening under your house.
If you’re weighing crawl space encapsulation vs. a vapor barrier, and wondering where a dehumidifier fits, you probably didn’t wake up thinking about your crawl space. Most people land here because of a symptom: a musty smell upstairs, mold on a baseboard, indoor allergies that ease the moment you step outside, or a contractor who looked under the house and said moisture.
The crawl space is the cause; the air you breathe upstairs is the symptom. The frustrating part is three common fixes at three very different prices. A basic vapor barrier runs a few hundred dollars, a crawl space dehumidifier lands around $1,200 to $2,500 installed, and full encapsulation runs $5,000 to $15,000 or more depending on size and condition.
The cheapest option isn’t automatically wrong, and the priciest isn’t automatically right. This guide compares all three honestly, the way a contractor would explain it standing under your house, so your money goes toward the fix that solves your actual problem, not one that just quiets the symptoms for a season. Below: how each solution works, what it misses, when each is the right call, and how to avoid the most expensive mistake in this category, buying the cheap fix twice.
Homeowners in Long Island, Brooklyn, The Bronx, and Queens, NY, Can Call on Mold Removal Experts for Free Expert Inspections and Proven Solutions Build to Last!
Schedule Your Assessment Today!
Why the crawl space matters more than people think: The U.S. Environmental Protection Agency identifies moisture control as the single most critical factor in preventing indoor mold growth — and notes that crawl spaces represent one of the most common and underestimated sources of that moisture in residential buildings.
Why Your Crawl Space Is the Problem and the Air Upstairs Is the Symptom
To make the right call on crawl space encapsulation vs vapor barrier, you need one piece of building science first, and it’s called the stack effect. Warm air rises and escapes through the upper levels of your home. As it exits, it creates a pressure difference that pulls replacement air up from below. A meaningful share of that replacement air comes directly out of the crawl space.
Whatever is happening under your house, humidity, mold spores, that musty smell, moisture evaporating off bare soil — it’s being continuously drawn upward into the rooms where you live. A damp crawl space is, in effect, a damp air supply for the floors above it. Once you understand that, the decision stops being about what’s convenient and starts being about what’s actually breaking the cycle.
That moisture reaches the crawl space from two directions. From below, water vapor evaporates constantly out of bare soil. A 1,000 square foot dirt floor can release several gallons of moisture per day into the air above it. From outside, humid air drifts in through open foundation vents. Here’s what catches most homeowners off guard: on a sticky summer day in the NY metro, those “ventilation” vents can actually make the crawl space wetter, not drier. Warm, moisture-laden outdoor air hits the cooler surfaces under your house and condenses directly on them, leaving behind exactly the kind of persistent dampness that mold needs to establish itself.
The three solutions below each attack this moisture from a different angle. That difference is the entire reason this choice deserves more than five minutes of thought.
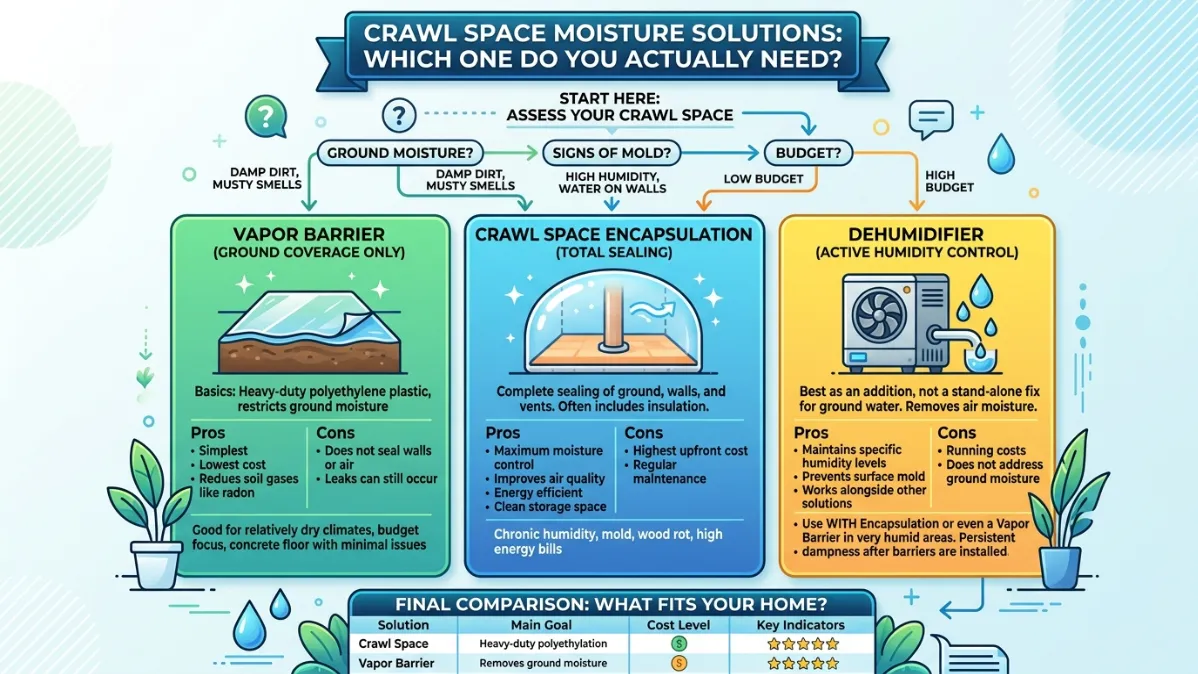
Side-by-Side Comparison
Crawl Space Encapsulation vs Vapor Barrier vs Dehumidifier: The Honest Numbers
Before diving into each option in depth, here’s how they line up across the factors that actually matter: cost, coverage, lifespan, and what each one leaves unresolved:
| Option | Typical NY-Metro Cost | What It Actually Does | Lifespan | Where It Falls Short |
|---|---|---|---|---|
| Vapor Barrier | $300 – $4,000 | Blocks moisture rising from soil | 10–20 years (liner quality dependent) | Does nothing about humid air coming through open foundation vents |
| Crawl Space Dehumidifier | $1,200 – $2,500 installed | Actively removes moisture from the air regardless of source | 5–10 years (mechanical) | Treats the symptom, not the source; runs continuously; needs electricity; will need replacing |
| Full Encapsulation — Most Complete | $5,000 – $15,000+ | Seals every moisture source: soil, vents, and infiltration | 15–25+ years | Highest up-front cost; requires professional installation |
Each Option Explained
What Each Solution Actually Does, and Where It Stops
Before diving into each option in depth, here’s how they line up across the factors that actually matter: cost, coverage, lifespan, and what each one leaves unresolved:
The Vapor Barrier
A polyethylene sheet laid across the crawl space floor to block moisture evaporating from the soil. In its simplest form — a thin liner rolled out loosely — it’s the most affordable option. A properly installed liner, with thicker material, overlapping seams, and edges run up the walls, works significantly better and lasts longer.
Typical Process
The crawl space is cleared of debris and sharp objects first. A polyethylene liner is then rolled across the soil floor, seams are overlapped and taped, and the liner is extended partially up the foundation walls to reduce ground moisture evaporation.
Benefits
- Lowest-cost crawl space moisture control option
- Helps reduce musty odors and dampness
- Can improve insulation performance
- Reduces moisture rising from exposed soil
Example Case Study
A Brooklyn homeowner with a vented crawl space and blown-in cellulose insulation wanted a cost-effective way to reduce ground moisture without fully sealing the area. A reinforced vapor barrier was installed beneath the insulation system to stabilize humidity and help protect the flooring structure above.
The Crawl Space Dehumidifier
A dedicated unit pulls moisture directly out of the air — it doesn’t matter whether that moisture came from the soil, the vents, or infiltration through the walls. That makes it powerful, but it also reveals its core weakness: it’s a machine treating a symptom. It runs, it consumes electricity, it eventually wears out, and the moment it stops, the moisture returns.
Typical Process
The crawl space is evaluated for moisture levels and square footage. A properly sized commercial-grade dehumidifier is installed, drainage lines are connected, and humidity targets are calibrated to maintain safer moisture conditions year-round.
Benefits
- Actively lowers humidity levels
- Helps prevent mold growth and condensation
- Improves indoor air quality
- Works well alongside encapsulation systems
Example Case Study
A Long Island homeowner noticed recurring musty odors every summer despite having a vapor barrier already installed. A crawl space dehumidifier was added to stabilize humidity levels during humid coastal weather and significantly reduce moisture buildup under the home.
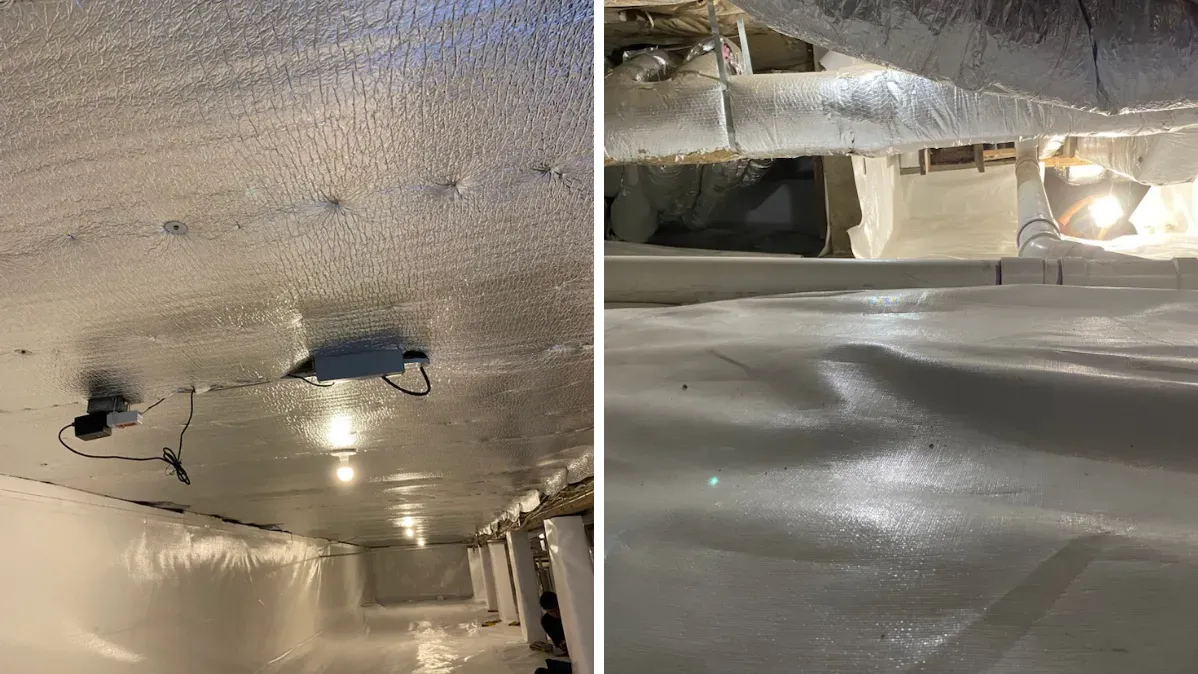
Full Encapsulation
The comprehensive system. Heavy-duty liner across the floor and up the walls, foundation vents sealed shut, all gaps and penetrations closed, and typically a dehumidifier added to maintain the sealed environment. It addresses every moisture source simultaneously — soil, vents, and air infiltration — and leaves the moisture no path in.
Typical Process
The crawl space is cleaned, dried, and repaired first. Drainage improvements are made if needed, foundation vents are sealed, a reinforced vapor barrier is installed across floors and walls, gaps are air sealed, and a dehumidifier is typically added to maintain controlled humidity levels.
Benefits
- Most complete moisture protection available
- Improves energy efficiency and indoor comfort
- Helps protect floor systems and structural framing
- Reduces mold risk and long-term humidity problems
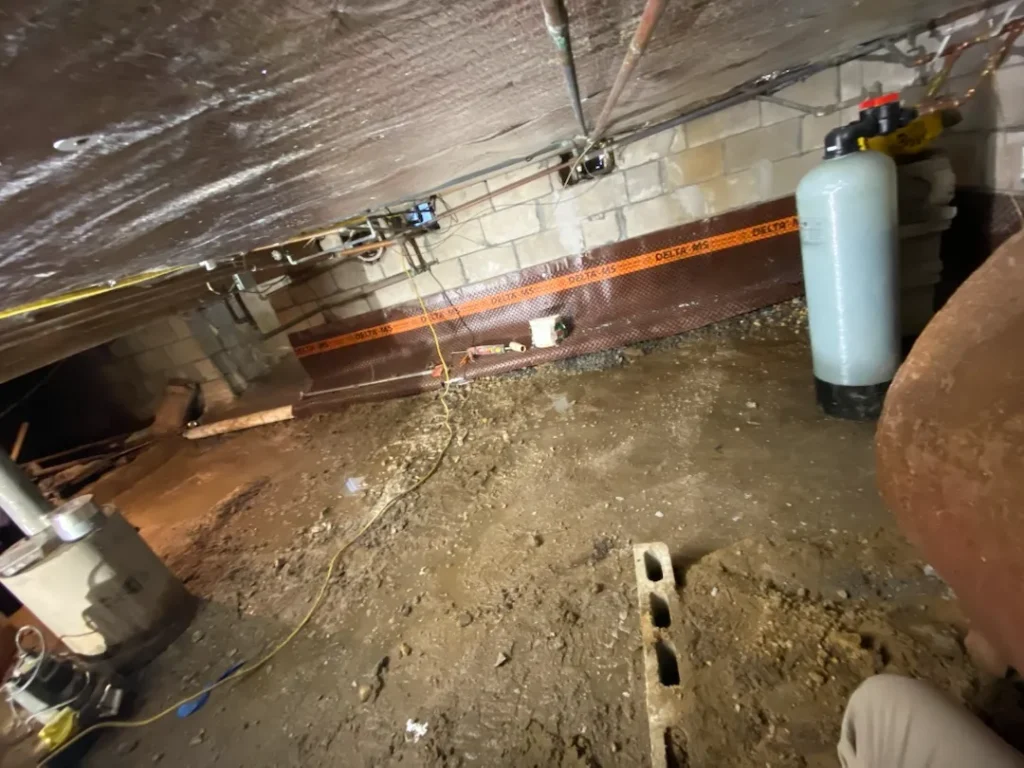
Patchogue, NY, Case Study by Zavza Seal (Owner of Mold Removal Experts)
A homeowner in Patchogue, NY contacted Zavza Seal LLC after persistent crawl space moisture, sagging floors, and musty odors began affecting indoor comfort and structural stability. During inspection, our team identified excessive humidity, exposed soil, air leakage through the rim joists, and deteriorating insulation conditions contributing to long-term moisture intrusion beneath the home.
To create a permanent moisture control solution, we performed a full crawl space encapsulation designed to isolate the space from outside air and ground vapor.
Solutions Implemented:
- Installed a reinforced 30-mil vapor barrier across the crawl space floor and walls
- Air sealed rim joists and foundation penetrations to reduce humid air infiltration
- Performed full crawl space encapsulation for long-term moisture control and energy efficiency
- Diagnosed 1-inch floor drop from progressive foundation settlement
- Sistered 18-foot beam with 2×8 and galvanized bolts
- Poured two 4,000 PSI concrete footings in 18-inch sonotubes
Installed two concrete-filled steel columns on plated footings - Phase-jacked the beam in measured increments without shock damage
Following completion, humidity levels stabilized, odors were reduced, and the crawl space environment became significantly cleaner, drier, and more structurally protected.
Benefits of Weighing Crawl Space Encapsulation vs Vapor Barrier Carefully Before You Spend
The most expensive mistake in this category isn’t choosing the wrong option. It’s choosing the cheap option, watching it fail, and then paying for the right option anyway, having essentially bought the same repair twice, or three times in some cases.
- Stops mold-laden air from being pulled up through the stack effect into living spaces
- Protects floor framing, joists, and subfloor from long-term moisture damage and wood rot
- Reduces heating and cooling costs by blocking cold or humid air from beneath conditioned floors
- Eliminates the musty odor at the source rather than masking it with air fresheners or HVAC filters
- Protects home resale value and prevents mold disclosure complications during a sale
- Reduces pest activity, damp crawl spaces attract insects and rodents that dry ones don’t
The health case for solving this completely: The CDC’s National Institute for Occupational Safety and Health links persistent indoor dampness and mold exposure to respiratory symptoms including chronic coughing, wheezing, and worsened asthma — effects that are especially significant for children, the elderly, and anyone with existing respiratory conditions. Getting moisture control right isn’t just a structural decision; it’s a health one. CDC.gov
Benefits of Weighing Crawl Space Encapsulation vs Vapor Barrier Carefully Before You Spend
No honest contractor recommends the same fix for every crawl space, because no two crawl spaces have identical moisture profiles. Here’s when each option is genuinely the right answer — not a compromise or a stepping stone, but the correct call for that specific situation.
A Vapor Barrier Is the Right Call When:
The crawl space is genuinely dry to begin with. The soil is the main — or only — moisture source. The space drains well and doesn’t hold standing water after heavy rain. Outdoor humidity is manageable rather than oppressive. In a truly low-risk crawl space, a properly installed quality liner is a smart, cost-effective fix, not a corner cut. It’s doing the right job for the right problem.
A Dehumidifier Makes Sense When:
There’s a real, active humidity problem to manage and the space is already sealed enough that the dehumidifier can actually win — meaning it has a finite, defined load of moisture to handle rather than an endless stream. Inside an encapsulated crawl space, a dehumidifier is a smart and relatively affordable finishing touch that keeps conditions in a stable, healthy range. Standalone in an open, vented space, it’s a band-aid with a permanent electric bill attached.
Full Encapsulation Is the Right Call When:
There’s a history of standing water or repeated flooding. Mold has appeared before. Insulation is wet, saggy, or falling. A musty odor is reaching the living space through floors and baseboards. Foundation vents are open and outdoor humidity is high — which describes most of the NY metro from May through September. When moisture is entering from multiple directions, the only fix that holds is one that closes all of them simultaneously. A partial fix in this situation isn’t a first step; it’s just a delay.
| Encapsulation Component | Typical Cost Per Sq Ft | Average Project Cost |
|---|---|---|
| Basic Vapor Barrier Installation | $1.50 – $4.00/sq ft | $300 – $4,000 |
| Crawl Space Dehumidifier | Typically priced by system size | $1,200 – $2,500 |
| Full Crawl Space Encapsulation | $5.00 – $15.00+/sq ft | $5,000 – $15,000+ |
| 20–30 Mil Reinforced Vapor Barrier Upgrade | Additional $1.00 – $3.00/sq ft | Depends on crawl space size |
| Drainage System & Sump Pump Additions | Varies by water conditions | $2,000 – $8,000+ |
| Want a complete breakdown of what affects crawl space encapsulation pricing in New York? | ||
Schedule a Free Inspection
Crawl Space Encapsulation vs Vapor Barrier vs Dehumidifier: Final Thoughts
When comparing crawl space encapsulation vs vapor barrier solutions, the real goal isn’t choosing the cheapest system. It’s choosing the one that actually solves the moisture problem your home is facing. A small humidity issue may only need a quality vapor barrier, while recurring dampness, mold, musty odors, or high NY-metro humidity usually demand a more complete encapsulation strategy.
The key is identifying every moisture source before spending money, so you avoid paying for temporary fixes that fail a year later. If you’re seeing signs of crawl space moisture, mold, or poor air quality, schedule a professional inspection today and get a clear, honest recommendation built around protecting your home, your air, and your long-term investment.