If you found us today searching for “cove joint leaking in basement”, you’ve likely seen water pooling where your basement wall meets the floor, or caught that musty smell after heavy rain. A leaking cove joint isn’t random. It’s often driven by hydrostatic pressure forcing water through the wall-floor seam; a structural cold joint created during construction. Left unchecked, it can lead to mold growth, wood rot, rising moisture levels, and long-term foundation damage.
This guide breaks down exactly what a cove joint is, how to identify transient vs. persistent seepage, what not to do, and which drainage or waterproofing solutions actually work. You’ll see how interior systems, exterior grading, sump pumps, air sealing, crawl space encapsulation, and full drainage strategies work together to stop basement water intrusion at the source.
Schedule Your Free Basement Waterproofing Inspection In Long Island, Brooklyn, Queens, Or The Bronx Today
Signs of a Cove Joint Leaking in Your Basement
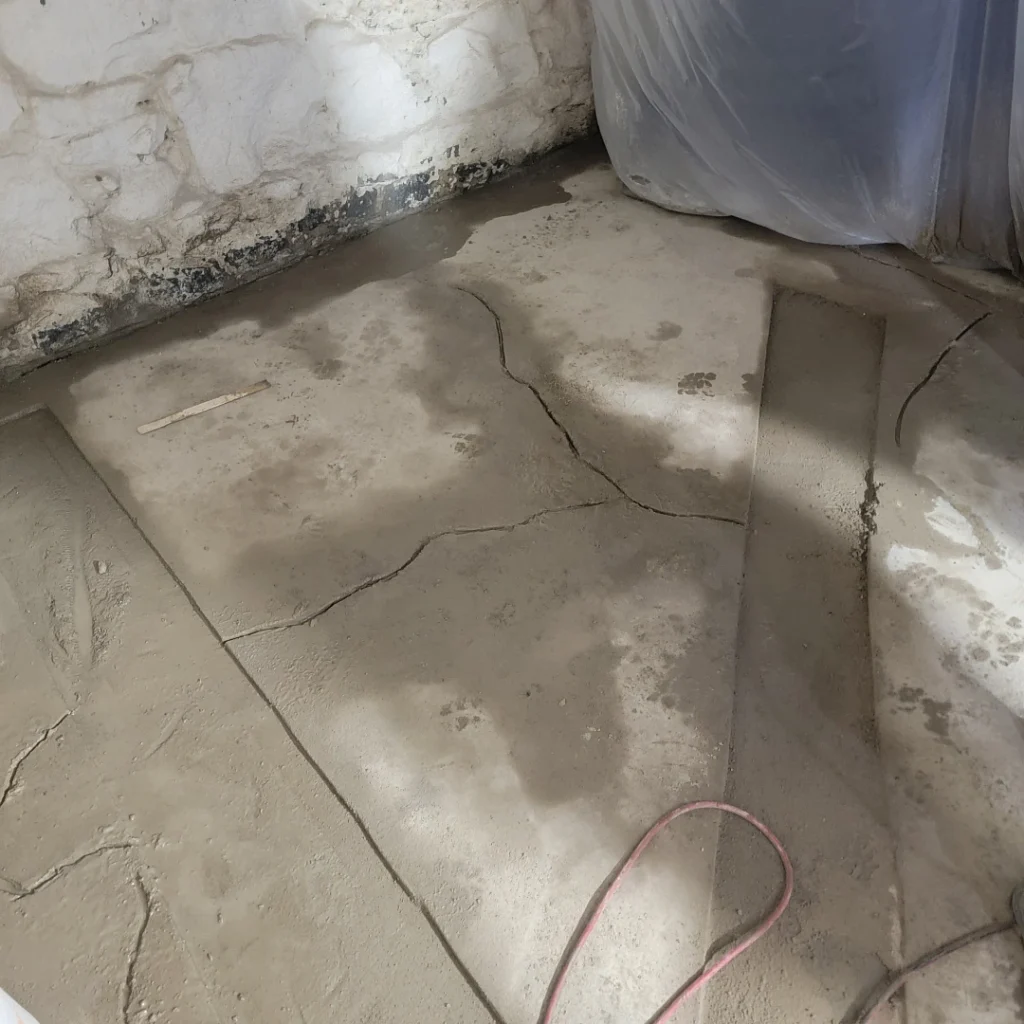
Let’s walk the perimeter of your basement step by step. Start at the wall-floor joint. Look closely at the seam where the foundation wall meets the slab. Do you see dampness, darkened concrete, or small beads of water forming along that line? That seam is the cove joint, and it is one of the most common entry points for basement water intrusion.
After rainfall, check for:
- Damp spots spreading outward from the wall-floor edge
- Light pooling along sections of the slab
- A chalky white residue along the joint, known as an efflorescence pattern
- A musty odor that lingers
- Staining, swelling trim, or soft wood near the perimeter
Next, determine whether you are dealing with transient vs persistent seepage.
- Transient seepage appears only after heavy storms and dries out.
- Persistent seepage returns frequently and may remain damp between rain events.
This distinction helps identify whether surface drainage, soil saturation, or ongoing hydrostatic pressure is driving the problem.
For a more precise evaluation, take moisture meter readings along the joint and record them across multiple sections. This process, often called baseline moisture mapping, reveals whether moisture levels are isolated or consistent along the foundation perimeter.
Post-Storm Symptom Checklist
After a rain event, inspect:
The entire cove joint perimeter
Corners where water may collect
Areas behind stored items
Spots near downspouts or poor exterior grading
Early detection reduces the risk of mold growth, wood rot, and interior damage. The goal is to identify patterns before structural issues develop.
What Not To Do: Common Misconceptions About Quick Fixes
Below is a comparison of common repair approaches:
| Fix Option | Longevity | Risk Profile |
|---|---|---|
| Interior Sealant | Short-term | May allow pressure buildup behind the wall |
| Polyurethane Injection | Medium-term | Effective for isolated cracks; performance depends on exterior drainage |
| Interior Drainage System (Drain Tile / French Drain) | Long-term | Redirects water safely and relieves pressure consistently |
Polyurethane injection can be appropriate for individual wall cracks. Cove joint seepage, however, is typically related to water movement along the entire wall-floor connection.
Effective waterproofing focuses on controlling and redirecting water rather than attempting to contain it at the surface. Interior drainage systems, combined with proper grading and discharge, manage pressure and guide water to a controlled exit point.
If you are evaluating whether this is a DIY issue, cosmetic patching is straightforward. Long-term moisture control requires a broader understanding of soil conditions, drainage patterns, and foundation behavior.
Solutions And Technical Fixes: How To Control Water At The Source
Once you confirm a cove joint leak, the next step is choosing the right strategy to control it. Effective waterproofing focuses on relieving hydrostatic pressure and managing how water moves around and beneath your foundation. Instead of concentrating on surface patches, the priority becomes collecting, redirecting, and safely discharging groundwater before it can accumulate along the wall-floor joint.
The solutions below address both active seepage and the underlying conditions that cause it, helping protect the structure over the long term.
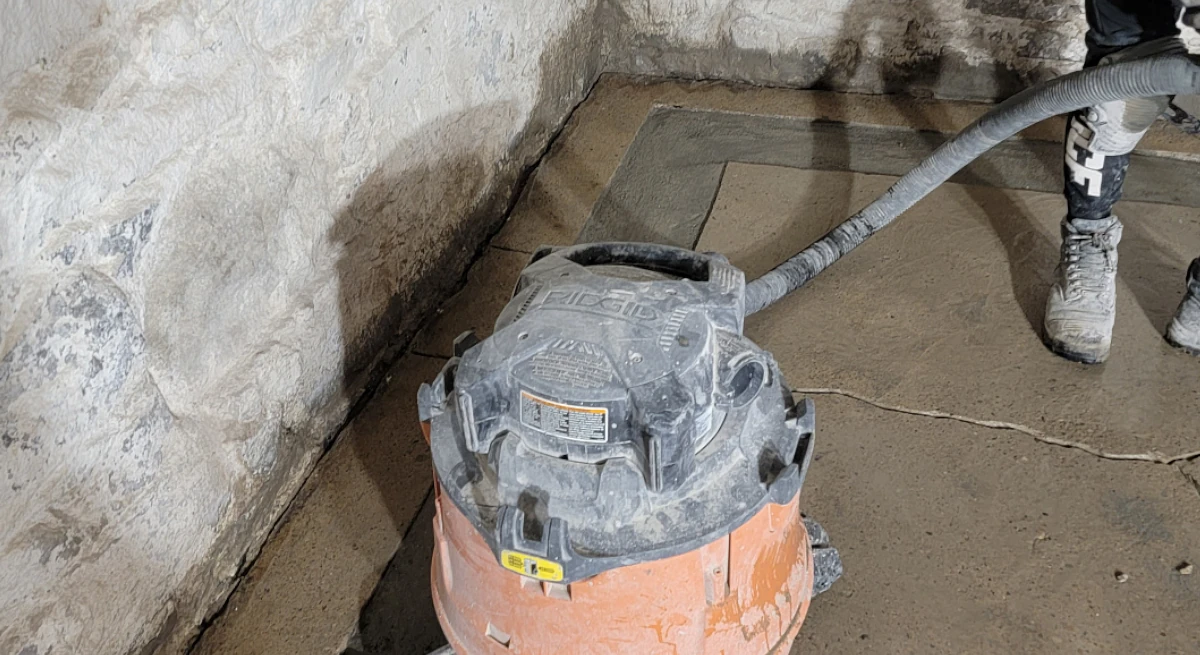
Interior Drainage Systems
An interior drainage system, often called drain tile or a French drain, is installed along the perimeter of the basement floor. It collects water at the wall-floor joint and channels it to a sump pump basin for controlled discharge.
This approach is highly effective for:
- Persistent seepage along long sections of the perimeter
- High water table conditions
- Clay-heavy soils that retain moisture
- Homes where exterior excavation is limited
Typical installed cost ranges from $3,000 to $8,000 depending on basement size and complexity. DIY installation is rare due to concrete removal and proper pitch requirements.
Sump Pump Installation
A sump pump removes collected water and discharges it safely away from the home. In many Long Island, Brooklyn, Queens, and Bronx properties, this is a critical component due to dense soil and storm cycles.
Installed cost typically ranges from $1,200 to $3,500 depending on pump capacity, battery backup, and discharge configuration.
Exterior Drainage and Grading
Exterior drainage addresses water before it reaches the foundation wall. This may include regrading soil, installing exterior French drains, or improving footing drains.
This option is often recommended when:
- Water intrusion is tied directly to poor surface runoff
- Downspouts terminate too close to the foundation
- The lot slopes toward the structure
Exterior solutions can range from $1,500 for grading adjustments to $10,000 or more for full perimeter excavation.
Cove Diverters
Cove diverters are specialized components installed along the wall-floor joint to guide water directly into a drainage channel. They are typically paired with an interior system for consistent performance.
When To Choose Interior Vs Exterior Solutions
Use this simple decision framework:
- If water appears along most of the basement perimeter during storms, interior drainage is usually appropriate.
- If water intrusion is localized near one wall with visible grading issues outside, exterior correction may resolve the issue.
- If the water table is consistently high in your area, interior pressure relief systems provide more predictable long-term performance.
In many cases, the strongest solution combines grading improvements outside with controlled drainage inside.
How To Prevent Cove Joint Leaks: Best Practices
Repairing active seepage solves the immediate problem, but long-term protection depends on prevention. How to prevent cove joint leaks starts with controlling the amount of water that collects around your foundation. The goal is to reduce hydrostatic pressure before it builds against the wall-floor seam. Small exterior corrections often make a measurable difference in basement moisture performance over time.
- Proper Landscape Grading: Soil should slope away from the foundation at least six inches over the first ten feet. Depressions or negative grading allow water to pool along the foundation wall, increasing pressure at the cove joint. Regrading compacted soil and maintaining that slope helps move runoff safely away from the structure.
- Gutter And Downspout Extensions: Roof runoff concentrates a significant volume of water at the base of the home. Downspouts should discharge a minimum of six to ten feet away from the foundation, ideally onto a splash pad or into a drainage line. In heavier rainfall zones, extensions and buried discharge lines provide more reliable control than short splash blocks.
- Soil Moisture Control: In clay-dense soils, expansion and contraction can influence foundation stress and joint movement. Overwatering landscaping beds near the home can contribute to persistent soil saturation. Managing irrigation schedules and directing water away from the foundation perimeter supports stable moisture conditions and reduces long-term pressure at the wall-floor joint.
Foundation Inspection Checklist
Perform a visual inspection at least twice per year:
- Check for new efflorescence patterns
- Inspect the cove joint perimeter
- Examine exterior grading
- Verify sump pump operation
- Confirm downspouts are clear
Seasonal Maintenance Plan
Before Storm Season:
- Clean gutters
- Test sump pumps and backup systems
- Confirm discharge lines are unobstructed
Before Winter:
- Ensure exterior grading remains intact
- Check for foundation cracks
- Verify proper drainage flow
Prevention reduces long-term repair costs and protects structural integrity. A proactive inspection strategy allows homeowners to identify early warning signs before moisture becomes a structural issue.
Cove Joint Leaking In Basement: Final Thoughts
A leaking cove joint is rarely an isolated event. It is usually a sign of pressure building around your foundation and water searching for the path of least resistance. Identifying seepage early, choosing the correct drainage strategy, and correcting exterior conditions protects both structural integrity and indoor air quality. Whether the issue is seasonal or persistent, a professional inspection provides clarity before minor moisture becomes major damage.
Schedule Your Free Basement Waterproofing Inspection In Long Island, Brooklyn, Queens, Or The Bronx Today
Frequently Asked Questions About Cove Joint Leaks
Why Does Water Go Through Cold Joints Instead Of Cracks?
A cold joint forms where two separate concrete pours meet. Because the materials cure at different times, they do not chemically bond as one continuous structure. Under hydrostatic pressure, water can migrate through this seam even if no visible crack is present.
How Do You Differentiate A Cove Joint Leak From A Wall Or Floor Crack?
Cove joint leaks appear along the continuous seam where the wall meets the slab. Wall cracks run vertically or diagonally up the foundation wall. Floor cracks appear across the slab surface. Moisture tracking along the perimeter joint usually indicates a cove joint issue.
Is Cove Joint Repair Covered By Homeowners Insurance?
Coverage depends on policy language. Most standard policies exclude water intrusion caused by groundwater or hydrostatic pressure. Sudden pipe failures are typically covered, but long-term seepage from foundation joints often is not. Always review your specific policy details.
What Is The Difference Between Polyurethane Injection And A Drainage System?
Polyurethane injection seals isolated cracks by expanding inside the void. A drainage system collects and redirects water at the perimeter. Injection addresses localized entry points, while drainage systems manage ongoing hydrostatic pressure across larger areas.
How Does Hydrostatic Pressure Affect A Foundation?
Hydrostatic pressure develops when saturated soil pushes against foundation walls. Over time, this pressure can force water through cold joints, widen existing cracks, and contribute to structural stress if unmanaged.
What Are The Early Signs Of Secondary Damage?
Common indicators include persistent musty odors, visible mold growth near baseboards, warped trim, efflorescence buildup, and soft or discolored wood. Prolonged moisture exposure can also affect stored belongings and framing materials.
Can A Cove Joint Leak Lead To Mold Growth?
Yes. Continuous moisture at the wall-floor junction creates a favorable environment for mold spores. Even small amounts of repeated seepage can raise humidity levels enough to support microbial growth.
Is A Cove Joint Leak A Structural Problem?
Not always. Many cases involve water management rather than structural failure. However, long-term pressure and moisture can contribute to foundation deterioration if left unresolved.
How Long Does A Cove Joint Repair Last?
Interior drainage systems are designed for long-term performance when properly installed and maintained. Sealants or patch materials may last temporarily but are not considered permanent moisture control solutions.
When Should I Schedule A Basement Waterproofing Inspection?
An inspection is recommended if you notice recurring dampness, visible seepage, efflorescence patterns, or post-storm pooling along the wall-floor joint. Early evaluation reduces repair costs and prevents secondary damage.