If you found us searching for, “How to Remove Black Mold from a Kitchen Sink?” you’re in the perfect place for that! Black mold around a kitchen sink can usually be cleaned when it is limited to the basin, rim, drain, strainer, or surface caulk. This guide gives you the safe steps to clean visible mold, remove buildup from sink parts, handle moldy caulk, and help keep the problem from coming back. The goal is not just to scrub the stain away, but to remove the moisture, grime, and trapped residue that allow mold to return. If the mold keeps coming back, spreads beyond the sink, appears on nearby walls or cabinets, mold gets on your carpet, or comes with a musty odor, the problem may be larger than a simple cleaning job.
In that case, professional mold remediation services can identify hidden moisture, remove contaminated materials, and help prevent the issue from spreading. Mold Removal Experts provides free mold inspections across Long Island, Queens, Brooklyn, and the Bronx. If your kitchen sink mold may be part of a bigger indoor mold problem, give Long Island and New York’s trusted mold removal team a call today.
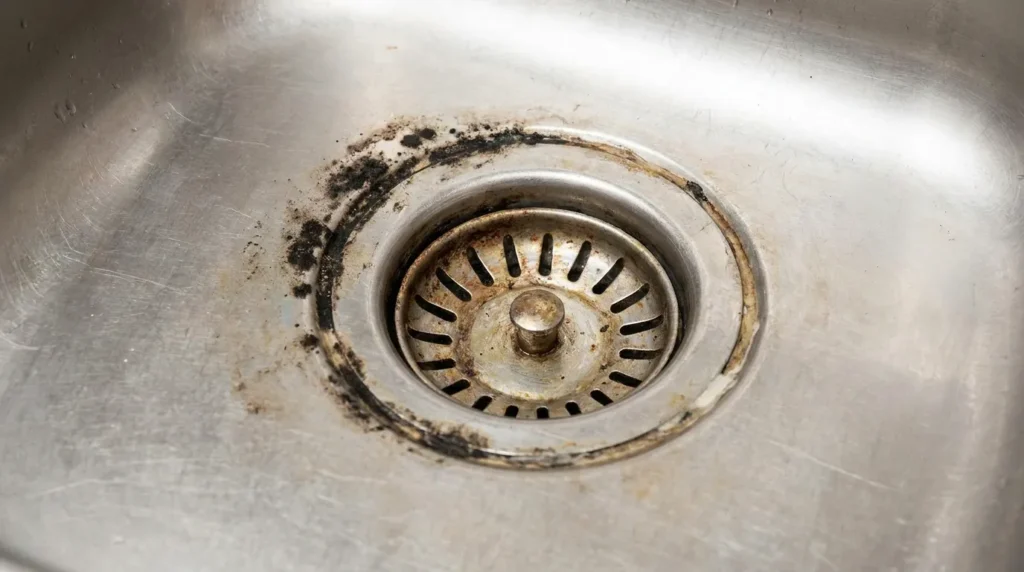
Is the Black Stuff Around Your Kitchen Sink Mold?
The black stuff around your kitchen sink may be mold, but it is not always mold. Kitchen sinks collect water, soap film, food particles, grease, minerals, and biofilm, and several of those can create dark buildup around the drain, strainer, faucet base, or caulk line.
Here are some pointers for you to help you identify whether or not you have mold in your sink:
- It May Be Mold: Dark, fuzzy, spotty, spreading, or musty growth around damp seams, caulk, drains, and strainers may be mold. Mold is especially likely if the area stays wet, smells musty, returns after cleaning, or appears on caulk, grout, wood, drywall, or cabinet materials.
- It May Be Biofilm or Food Gunk: Slimy black buildup around the drain or strainer is often biofilm mixed with grease, soap residue, coffee grounds, food particles, and decomposing organic matter. This buildup can smell unpleasant and look like mold, even when it is mostly drain grime.
- It May Be Mineral Staining: Hard water, rust, metal residue, countertop staining, or old sealant can also leave dark marks near the sink. These stains usually look flatter and do not spread the same way mold does.
- How to Tell the Difference: Mold is more likely when the material looks fuzzy or speckled, has a musty smell, keeps coming back, or grows along damp caulk, cabinet seams, wood, or drywall. If the black buildup is slimy and mostly inside the drain, it may be biofilm. Either way, cleaning the area and keeping it dry is the first step.
Why Black Mold Grows Around Kitchen Sinks
- It May Be Mold: Dark, fuzzy, spotty, spreading, or musty growth around damp seams, caulk, drains, and strainers may be mold. Mold is especially likely if the area stays wet, smells musty, returns after cleaning, or appears on caulk, grout, wood, drywall, or cabinet materials.
- It May Be Biofilm or Food Gunk: Slimy black buildup around the drain or strainer is often biofilm mixed with grease, soap residue, coffee grounds, food particles, and decomposing organic matter. This buildup can smell unpleasant and look like mold, even when it is mostly drain grime.
- It May Be Mineral Staining: Hard water, rust, metal residue, countertop staining, or old sealant can also leave dark marks near the sink. These stains usually look flatter and do not spread the same way mold does.
- How to Tell the Difference: Mold is more likely when the material looks fuzzy or speckled, has a musty smell, keeps coming back, or grows along damp caulk, cabinet seams, wood, or drywall. If the black buildup is slimy and mostly inside the drain, it may be biofilm. Either way, cleaning the area and keeping it dry is the first step.
Is Black Mold in the Kitchen Sink Dangerous?
Small surface mold around a kitchen sink is usually lower risk when it is cleaned quickly and safely. Still, it should not be ignored. Mold can bother people with allergies, asthma, respiratory conditions, weakened immune systems, or mold sensitivity.
Do not panic over a few small visible spots around the drain or caulk line. Clean the area, dry it completely, and watch for signs that it returns. A small patch that disappears after cleaning is usually much less concerning than growth that keeps spreading.
Do not ignore recurring mold. If the same black spots come back after cleaning, the sink area is staying damp or there may be a leak under the rim, faucet, disposal, drain, or cabinet. The source of the moisture has to be fixed before the mold will stop.
Do not scrub large mold areas without protection. Wear gloves, eye protection, and an N95 mask or respirator when cleaning visible mold, especially around caulk, drains, or cabinet materials.
Call a professional when mold spreads into cabinets, walls, flooring, subflooring, drywall, or hidden areas under the sink. Surface cleaning is not enough when the problem has moved into porous building materials or points to ongoing water damage.
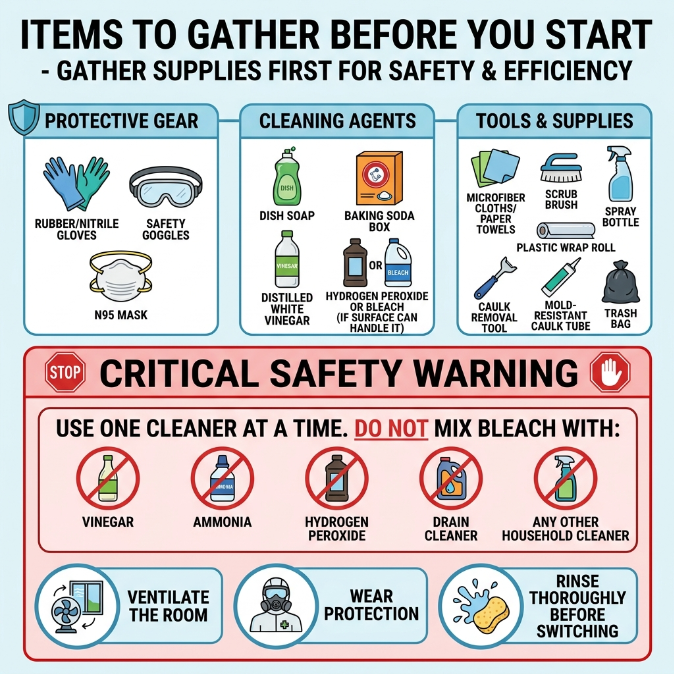
Items to Gather Before You Start
Gather your supplies before cleaning so you can work safely and avoid switching cleaners in the middle of the job.
- Rubber or nitrile gloves
- Safety goggles
- N95 mask or respirator
- Dish soap
- Warm water
- Microfiber cloths or disposable paper towels
- Old toothbrush or small scrub brush
- Spray bottle
- Baking soda
- Distilled white vinegar
- Hydrogen peroxide or bleach, if the surface can safely handle it
- Plastic wrap, if treating moldy caulk
- Caulk removal tool, if replacing old caulk
- Mold-resistant kitchen and bath silicone caulk
- Trash bag for contaminated wipes or old caulk
Use one cleaner at a time. Do not mix bleach with vinegar, ammonia, hydrogen peroxide, drain cleaner, or any other household cleaner. Ventilate the room, wear protection, and rinse thoroughly before switching to a different product.
Before Cleaning: Protect Yourself and the Surface
Before you start cleaning black mold from a kitchen sink, take a few minutes to protect yourself and the surfaces around the basin. Most small sink mold problems are safe to handle with basic precautions, but poor ventilation, harsh scrubbing, or the wrong cleaner can damage your sink, countertop, caulk, or drain.
Ventilate the Kitchen
Open a window, run the kitchen exhaust fan, or turn on a nearby fan before you begin. Good airflow helps reduce odors, moisture, and airborne particles while you clean. Keep the area ventilated until the sink and surrounding surfaces are fully rinsed and dry.
Wear Gloves, Eye Protection, and a Mask
Put on rubber or nitrile gloves, safety goggles, and an N95 mask or respirator before touching moldy areas. This is especially important when scrubbing around the drain, handling bleach, treating stained caulk, or cutting out old silicone. Protective gear keeps cleaner, mold residue, and loose debris away from your skin, eyes, and lungs.
Test Cleaners First
Before using vinegar, hydrogen peroxide, bleach, or any mold cleaner, test it on a hidden area first. This matters if your sink or countertop includes natural stone, colored caulk, painted material, specialty finishes, or metal that may stain or discolor. Wait a few minutes, wipe the test spot, and check for dulling, fading, etching, or surface damage before applying the cleaner to a larger area.
Avoid Bleach on Natural Stone
Bleach, vinegar, and acidic cleaners can damage some natural stone surfaces. Marble, limestone, travertine, and certain granite countertops may etch, dull, or discolor when exposed to harsh or acidic products. If your kitchen sink is surrounded by stone, use a stone-safe cleaner and avoid soaking the seam where the sink meets the counter.
Do Not Pour Bleach After Vinegar or Drain Cleaner
Never pour bleach into a drain after using vinegar, ammonia, hydrogen peroxide, drain cleaner, or another chemical product. Sink drains are confined spaces, and mixed cleaners can release dangerous fumes. Use one cleaner at a time, rinse thoroughly before switching methods, and keep the room ventilated from start to finish.
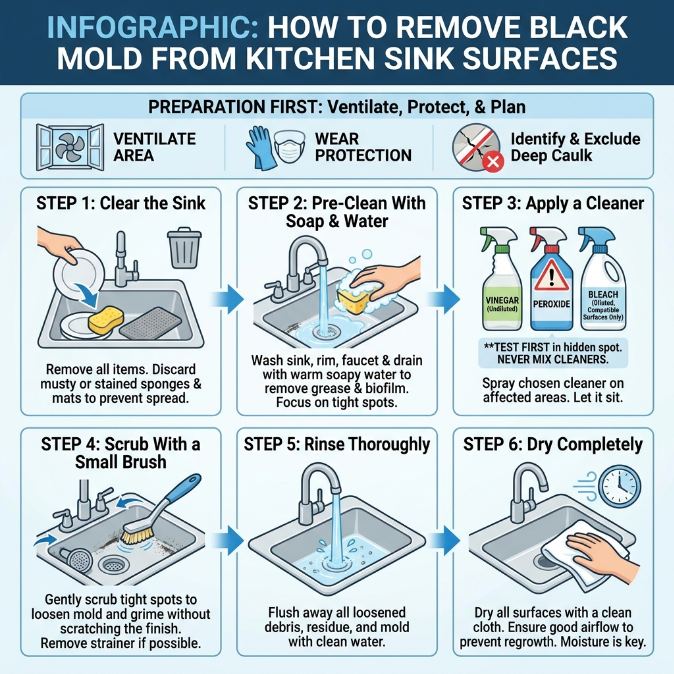
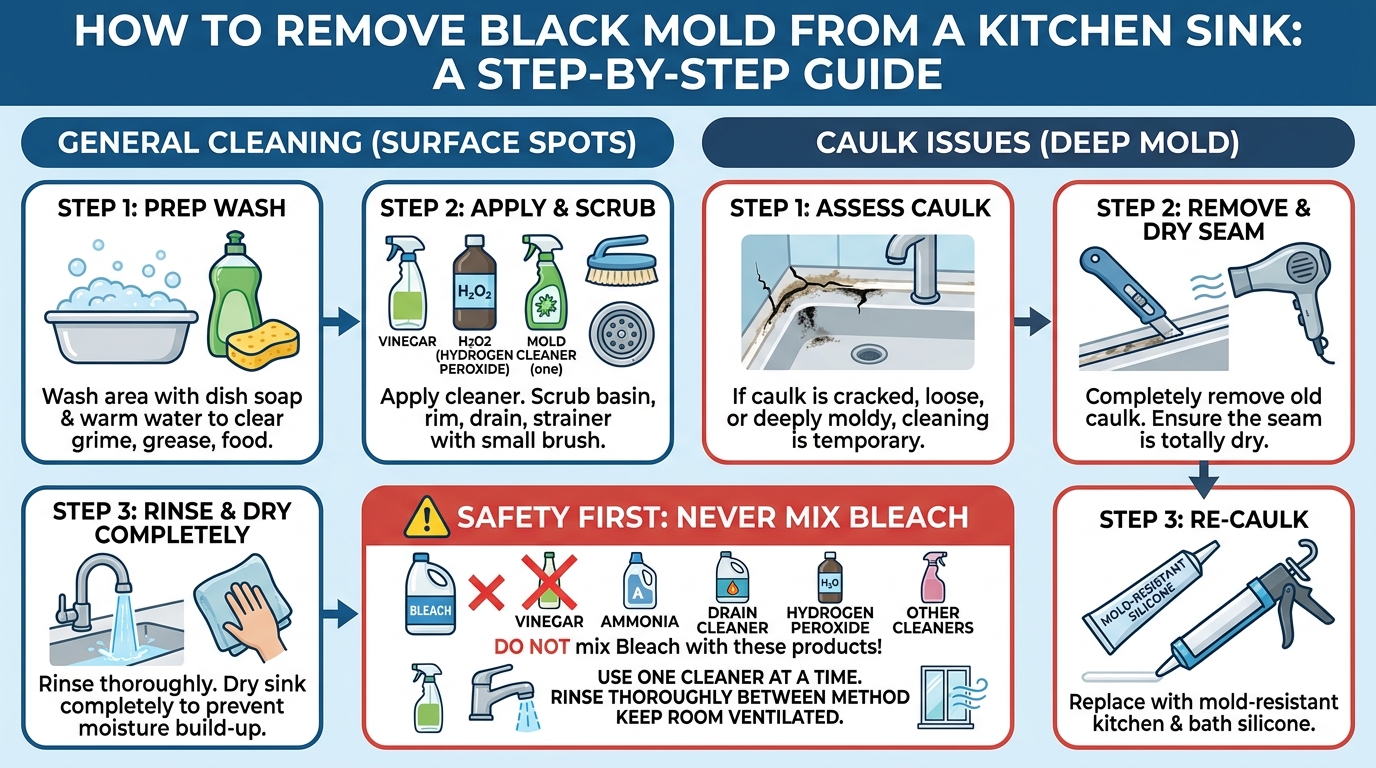
How to Remove Black Mold From Kitchen Sink Surfaces
Once the area is ventilated and you have the right protection, you can clean the visible mold from the sink basin, rim, faucet base, strainer, and drain area. Save badly stained or cracked caulk for a separate caulk removal step, since mold can grow deeper into old silicone.
(for walls, check our Guide Here!)
Step 1: Clear the Sink
Remove dishes, sponges, sink mats, drain covers, strainers, and anything stored around the basin. Throw away old sponges or sink mats if they smell musty or show dark staining, since they can keep spreading moisture and residue back onto the sink.
Step 2: Pre-Clean With Dish Soap and Warm Water
Wash the sink, rim, faucet base, drain area, and counter edge with dish soap and warm water. This removes grease, food particles, soap film, and biofilm so your mold cleaner can reach the affected surface. Pay close attention to tight spots around the strainer, faucet base, and underside of the sink rim.
Step 3: Apply a Cleaner
For routine sink mold on hard surfaces, spray undiluted white vinegar on the affected areas and let it sit before scrubbing. Hydrogen peroxide may also work on compatible surfaces. For nonporous surfaces that can safely handle it, a properly diluted bleach solution may be used, but do not combine it with any other cleaner.
If you are unsure how the surface will react, test the cleaner first in a hidden spot. This is especially important for stone countertops, colored finishes, metal surfaces, and specialty sink materials.
Step 4: Scrub With a Small Brush
Use an old toothbrush or detail brush to scrub around the drain, strainer, faucet base, basin corners, and under the rim. Work gently but thoroughly so you loosen mold, grime, and buildup without scratching the finish. If the strainer lifts out, remove it and scrub both sides before rinsing.
Step 5: Rinse Thoroughly
Rinse the sink, drain area, strainer, and surrounding surfaces with clean water. Flush away loosened debris, cleaner residue, and mold particles so they do not sit in the basin or collect around the drain. If you plan to switch to another cleaning method, rinse extra carefully first.
Step 6: Dry Completely
Dry the sink, counter seam, faucet base, strainer, drain area, and underside of the rim with a clean cloth or paper towel. Moisture left behind is the fastest path to regrowth. Once the sink is dry, leave the area open to airflow so the caulk line, rim, and drain edge do not stay damp.
| Cleaner | Best For | Avoid On | Key Safety Note |
|---|---|---|---|
| Dish Soap and Water | First-pass cleaning, grease, food residue | None for most sink surfaces | Dry completely after cleaning |
| Vinegar | Light mold, odor, routine cleaning | Natural stone, some specialty finishes | Never mix with bleach |
| Baking Soda Paste | Gentle scrubbing and deodorizing | Delicate finishes if scrubbed hard | Rinse residue fully |
| Hydrogen Peroxide | Caulk stains and non-bleach cleaning | Some colored materials | Never mix with vinegar |
| Diluted Bleach | Compatible nonporous surfaces | Natural stone, metals prone to corrosion, porous materials | Never mix with ammonia, vinegar, or other cleaners |
Bleach should not be treated as the automatic best choice for sink mold. It can be useful on compatible nonporous surfaces when used carefully, but routine mold cleanup depends more on removing grime, scrubbing the affected area, fixing the moisture source, and drying everything completely. If the sink keeps getting wet or the caulk has failed, even a strong cleaner will only provide a temporary result.
When Cleaning Is Not Enough
Cleaning is not enough when mold keeps coming back within days or weeks. Recurring mold means the area is still staying wet, the material is damaged, or the growth has moved beyond the visible surface.
Caulk is one of the clearest signs. If the caulk is cracked, loose, soft, peeling, or deeply stained, mold may be embedded in the silicone or growing behind the seam. Scrubbing the surface will not restore a failed seal. The old caulk should be removed, the joint should be dried, and a new bead of mold-resistant kitchen and bath silicone should be applied.
You should also look under the sink. A musty smell, swollen cabinet wood, soft spots, staining, or visible mold on the cabinet backing can point to hidden moisture. The same is true if the sink rim leaks, the garbage disposal drips, the P-trap seeps, or the countertop is separating from the sink.
Mold that spreads beyond the sink area is another warning sign. If you see growth on drywall, subflooring, cabinet materials, or nearby walls, the issue is no longer just a dirty sink. It may involve a hidden leak or water damage that needs professional inspection.
Recurring mold is not a cleaning problem. It is a moisture problem.
How to Stop Black Mold From Coming Back Around the Kitchen Sink
The best way to stop black mold from coming back is to remove the moisture and buildup that allow it to grow. A clean sink can still develop mold if water keeps sitting around the rim, drain, faucet base, or caulk line.
Dry the Sink After Heavy Use
After washing dishes or using the sink heavily, wipe the caulk seam, faucet base, drain area, and counter edge with a clean towel. A few seconds of drying can prevent water from sitting overnight and feeding new mold growth.
Fix Leaks Immediately
Check the supply lines, shutoff valves, P-trap, garbage disposal, faucet seals, drain connections, and sink rim for slow leaks. Even a small drip can keep the cabinet or caulk line damp enough for mold to return.
Remove Wet Sponges and Sink Mats
Sponges, rags, brushes, and sink mats hold moisture against the sink. Store them where they can dry fully, and replace them if they smell musty or show dark staining.
Keep the Cabinet Dry
Open the sink cabinet after cleaning or anytime the area feels humid. Better airflow helps dry small amounts of trapped moisture around pipes, cabinet walls, and the underside of the sink.
Improve Ventilation
Use a kitchen exhaust fan, open a window, run a dehumidifier, or improve HVAC airflow if the kitchen stays humid. Mold grows faster when moisture lingers in still air.
Re-Caulk Failing Seams
If the caulk around the sink is cracked, loose, stained, or moldy beneath the surface, replace it. Use mold-resistant silicone made for kitchens and baths, and make sure the seam is completely clean and dry before applying it.
Clean the Drain Weekly
Flush food residue and biofilm from the drain before it turns into odor or black buildup. Clean the strainer, drain lip, and visible drain opening with dish soap, hot water, and a small brush as part of your routine kitchen cleaning.
Frequently Asked Questions About How to Remove Black Mold From Kitchen Sink Caulk, Drains, and Strainers:
How do you remove black mold from a kitchen sink?
Remove black mold from a kitchen sink by washing the area with dish soap and warm water, applying vinegar or another surface-safe cleaner, scrubbing the basin, rim, drain, and strainer, then rinsing and drying the sink completely. Replace caulk if the mold is embedded, deeply stained, or keeps returning.
How do you remove black mold from kitchen sink caulk?
Clean light mold on kitchen sink caulk with dish soap, water, vinegar, or hydrogen peroxide, then scrub gently and dry the seam. If the caulk is cracked, peeling, loose, soft, deeply stained, or moldy underneath, remove it and apply new mold-resistant kitchen and bath silicone.
Why does black mold keep coming back around my kitchen sink?
Black mold keeps coming back around a kitchen sink because the area is staying damp. Common causes include standing water, old caulk, a slow plumbing leak, food residue, poor airflow, wet sponges, or moisture trapped under the sink rim. Cleaning will not last until the moisture source is fixed.
Is black mold around a kitchen sink dangerous?
Small surface mold around a kitchen sink is usually manageable when cleaned promptly and safely. However, mold can irritate people with allergies, asthma, respiratory conditions, immune concerns, or mold sensitivity. Recurring, widespread, or hidden mold should be inspected because it may point to water damage.
Can I use bleach to clean black mold from my kitchen sink?
You can use properly diluted bleach on some compatible nonporous sink surfaces, but it is not always the best first choice. Never mix bleach with vinegar, ammonia, hydrogen peroxide, drain cleaner, or other cleaners. Avoid bleach on natural stone, delicate finishes, and materials that may corrode or discolor.
Does vinegar kill black mold around a sink?
Vinegar can help clean light mold on many hard sink surfaces and may reduce odor and surface growth. It may not remove deep staining or mold embedded in old silicone caulk. If the caulk remains stained or the mold returns quickly, removing and replacing the caulk is usually more effective.
Can black mold grow in a kitchen sink drain?
Yes. Black mold or mold-like buildup can grow in a kitchen sink drain because drains collect moisture, food particles, grease, soap film, and biofilm. Clean the drain opening, strainer, and visible residue regularly, and never mix bleach, vinegar, drain cleaner, hydrogen peroxide, or other chemical products in the drain.
Should I replace moldy sink caulk?
Replace moldy sink caulk if it is cracked, loose, peeling, soft, deeply stained, or mold returns soon after cleaning. New mold-resistant kitchen and bath silicone creates a tighter seal and removes contaminated old material that may be holding moisture and mold below the surface.