Reviewed by: Jake Kamin – Certified Structural Specialist | Reading time: 14 minutes
The short answer: A sagging upstairs floor is almost always a structural symptom, not a flooring problem. The most common causes are undersized or weakened floor joists, failed or missing support beams, long-term moisture damage, settled load-bearing walls below, or notched joists from past plumbing and HVAC work. A floor that visibly slopes, bounces, or has a dip you can feel through your shoes needs a structural inspection, not a new subfloor.
If you’re standing in an upstairs bedroom right now noticing the floor dips toward the middle, or a marble rolls on its own across the hallway, you’re not imagining it. And you’re not overreacting by looking this up.
Sagging upstairs floors are one of the most misunderstood structural issues in residential homes. Homeowners assume it’s “just an old house thing.” Sometimes it is. Sometimes it’s the early warning sign of a load-path failure that’s been quietly progressing for years.
This guide walks you through exactly what’s happening under your floor, what causes it, when it’s urgent, and what a real fix looks like, so you can make an educated decision about your sagging floors.
In Long Island, Brooklyn, Queens, or The Bronx? Contact Us for a Free Inspection and Expert Opinion!

What "Sagging" Actually Means Structurally
When your upstairs floor sags, what you’re feeling is deflection: engineering-speak for how much a structural member bends under load. Every floor deflects a little. Building codes allow joists to deflect up to L/360 (the joist’s span in inches divided by 360) under live load. For a 14-foot joist span, that’s roughly 0.47 inches of bend, and you’d never feel it.
What you can feel is anything beyond that. A floor that has dipped 3/4 of an inch or more across a room has either:
- Lost stiffness in the joists (rot, insect damage, splits, over-notching)
- Lost support beneath the joists (failed beam, settled post, removed wall)
- Been overloaded beyond what it was originally designed to carry
- Deflected over decades due to undersized lumber or long spans
Here’s the part most homeowners miss: the floor itself, the plywood, the hardwood, the carpet, is rarely the problem. The floor is just the visible surface telling you something is wrong with the framing system underneath it.
This is why “just replacing the subfloor” almost never fixes a true sag. You can put a brand new sheet of 3/4″ plywood over rotted or undersized joists and the floor will sag again within a season.
Breathe Easy Again with Our Expert Crawl Space Mold Removal Services for New York Properties
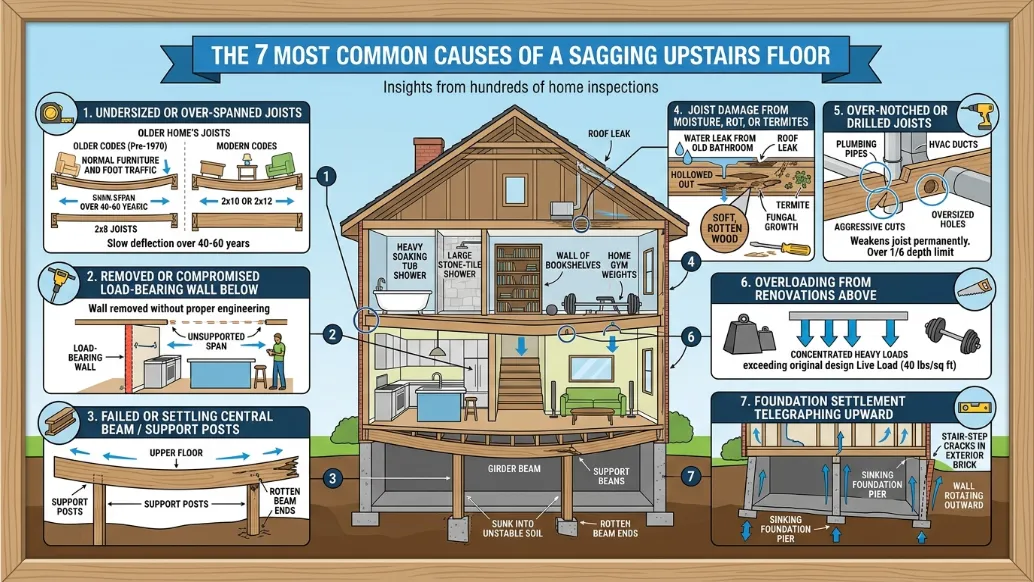
In our experience in structural repair and waterproofing, sagging second-story floors almost always trace back to one (or a combination) of these seven issues.
1. Undersized or Over-Spanned Joists
Older homes, especially anything built before 1970, were often framed with joists that meet the minimum code of that era, not the code we’d require today. A 2×8 joist spanning 16 feet was once acceptable. Today’s engineering tables would call for a 2×10 or 2×12 across that distance. The original framing didn’t fail. It just slowly deflected over 40 to 60 years under normal furniture and foot traffic.
Tell-tale sign: The sag is gradual, centered in the room, and the home is older than the homeowner.
2. Removed or Compromised Load-Bearing Wall Below
The single most common cause of a sudden new sag is a previous owner who “opened up the floor plan” without proper engineering. A wall on the first floor that was carrying joist loads gets removed, and a temporary header, or worse, no header, replaces it. The floor above slowly drops over the unsupported span.
Tell-tale sign: Drywall cracks above doorframes downstairs, a noticeable dip directly above a kitchen island or “opened” living room, doors upstairs that suddenly won’t latch.
3. Failed or Settling Central Beam / Support Posts
In two-story homes, the main girder beam in the basement or crawl space carries the load of the floors above. If that beam has rotted, sagged between piers, or sits on a post that has sunk into unstable soil, the entire stacked floor system above it follows.
Tell-tale sign: The dip runs in a line across multiple rooms upstairs, often through the center of the house, because it mirrors the beam line below.
4. Joist Damage From Moisture, Rot, or Termites
This one’s sneaky. A roof leak two homeowners ago, a long-forgotten bathroom drip, or termite activity in a poorly ventilated wall cavity can hollow out joists from the inside. The wood looks fine from below until you press a screwdriver into it.
Tell-tale sign: The sag is localized, often near a bathroom, exterior wall, or beneath an old roof leak. May be accompanied by musty smells, staining on the ceiling below, or visible fungal growth.
5. Over-Notched or Drilled Joists
Plumbers and HVAC installers sometimes cut large notches or bore oversized holes through joists to run pipes and ducts. Code limits how much wood you can remove from a joist (generally no more than 1/6 the depth, and only in certain zones along the span). Aggressive cuts permanently weaken the joist and accelerate deflection.
Tell-tale sign: The sag is concentrated near plumbing chases, above bathrooms, or in the path of HVAC trunk lines.
6. Overloading From Renovations Above
A homeowner installs a heavy soaking tub, a large stone-tile shower, a wall of built-in bookshelves, or converts a bedroom into a home gym with weight equipment. The original floor system was designed for roughly 40 lbs per square foot of live load. Concentrated heavy loads exceed that locally and cause the joists to deflect under the new weight.
Tell-tale sign: The sag appeared after a remodel and is centered under the heavy fixture.
7. Foundation Settlement Telegraphing Upward
When a foundation settles, every floor above it moves with it. A sinking interior pier, a heaved slab, or a wall that’s rotated outward all transfer movement up through the load path. The upstairs floor is sometimes the first place a homeowner notices a foundation problem.
Tell-tale sign: Sticking doors and windows throughout the house, stair-step cracks in exterior brick, gaps appearing where trim meets walls.
How to Tell If It's Cosmetic, Serious, or Dangerous
Not every sag means call-the-engineer urgency. Here’s how contractors actually triage:
| Severity | What You’ll Notice | What It Usually Means | Timeframe to Act |
|---|---|---|---|
| Cosmetic | Slight dip under 1/4″ across a room. Stable for years. No new cracks. | Old-home settling that finished decades ago. | Monitor. Document with photos. |
| Moderate | 1/4″ to 3/4″ dip. Floor bounces when walking. Some drywall cracks. | Active deflection. Joists likely undersized or partially compromised. | Professional inspection within 60–90 days. |
| Serious | 3/4″ to 1.5″+ dip. Visible slope to the eye. Doors won’t close. Cracks growing. | Failed support somewhere in the load path. | Inspection within 2–4 weeks. |
| Dangerous | 1.5″+ dip. Floor feels spongy or unstable. Cracking sounds. Recent rapid change. | Imminent structural failure risk. | Stop using the room. Inspect immediately. |
A simple test: Place a marble or a steel ball bearing on the floor in the middle of the room. If it rolls slowly, you have measurable deflection. If it rolls fast and far, you have a problem worth diagnosing now.
The DIY Self-Diagnosis Walkthrough
Before you call anyone, spend 30 minutes documenting what’s actually happening. Good information makes a contractor’s inspection faster, cheaper, and more accurate.
What to gather:
- Measure the dip. Lay a 6-foot level or a straight 2×4 across the lowest point of the floor. Use a tape measure to record the gap between the level and the floor at the deepest spot. Write it down.
- Map the sag’s shape. Is it a single low point in the middle? A slope running one direction? A line that crosses multiple rooms? Sketch it on a piece of paper.
- Check the floor below. Go directly underneath the sagging area. Look for cracks in the ceiling, stains, sagging drywall, or recent renovations.
- Inspect the basement or crawl space. Find the joists or beam that supports the room above. Look for: moisture stains, fungal growth, sagging beams, posts that don’t sit flush, notches or large holes in joists, or sister joists that look added later.
- Note any doors and windows that don’t operate right anywhere in the house. These are clues about load path movement.
- Take photos. Date them. If you can, repeat the measurement in 30 days and compare.
If the measurement is changing month to month, that’s an active problem. If it’s been the same for the 8 years you’ve owned the home, it’s likely stabilized, but still worth confirming.
Case Study: A 1962 Two-Story With a 1.5″ Dip in the Master Bedroom
The Call
A homeowner contacted us about their upstairs master bedroom floor. They’d noticed the dresser leaning toward the center of the room and a marble that rolled to the same spot every time they dropped one. The house was built in 1962, two stories, full basement, and they’d lived there for 11 years.
The Initial Inspection
We measured a 1-1/2 inch dip across the 14-foot bedroom floor, centered roughly under where the load from above met the original framing below. Doors in the upstairs hallway had been planed twice over the years to keep closing. A hairline crack ran above the downstairs dining room doorway.
What We Found in the Basement
The main steel I-beam ran straight down the center of the house, supported by three lally columns. Two of the three columns sat on original poured concrete pads (fine). The middle column, however, sat on a pad that had cracked and tilted approximately 3/4 of an inch. Above it, the beam had deflected, pulling the floor joists down with it. Compounding the problem, two joists adjacent to a 1980s-era bathroom remodel had been notched aggressively for a drain line and had partially split along the notch.
The Diagnosis
Two stacked problems. A settling support post causing global sag across the center of the home, plus localized joist weakness over the old plumbing run.
The Repair Plan
- Stabilize the pad. We excavated under the failing lally column, poured a new properly sized concrete footing on compacted, undisturbed soil, and let it cure.
- Re-support the beam. We installed an adjustable steel post on the new footing and used hydraulic jacks to lift the beam back toward level, slowly, over the course of several days, to avoid cracking finishes upstairs.
- Sister the compromised joists. We added new full-length joists alongside the notched originals, glued and through-bolted, restoring the section’s full load capacity.
- Reinforce with blocking. We added solid blocking between joists at mid-span to reduce future deflection.
The Outcome
The master bedroom floor returned to within 1/4″ of level. We deliberately didn’t push it all the way, because forcing a 60-year-old home fully flat can crack plaster, tile, and trim. The marble test passed. Doors operated normally. A follow-up measurement six months later showed zero additional movement. Total project time: about a week of active work, spread across two and a half weeks to allow for the concrete cure and gradual lifting.
How Contractors Actually Repair Sagging Upstairs Floors
There’s no single fix because there’s no single cause. A good contractor matches the repair to the diagnosis. These are the most common approaches we use, ranked roughly from least to most invasive.
Sistering Joists
Adding a new joist alongside an existing weakened one, fastened with structural adhesive and through-bolts or nails on a specified pattern. Restores load capacity without removing the original framing. Best for: rot, splits, over-notched joists in accessible spaces.
Adding Mid-Span Support
Installing a new beam and posts under the existing joists to shorten their unsupported span. Effectively turns one long, deflecting span into two shorter, stiffer ones. Best for: undersized joists across long spans, finished basement rooms where reframing is impractical.
Adjustable Steel Posts (Smart Jacks / Telescoping Columns)
In crawl spaces and basements, adjustable steel columns can be installed on properly engineered footings and slowly tightened over weeks or months to gently lift sagging floors back toward level. Best for: central beam settlement, crawl space support failures.
Replacing Failed Beams or Girders
When the main carrying beam itself has rotted, cracked, or deflected beyond repair, it must be replaced, usually with engineered lumber (LVL) or steel. This is significant work and requires temporary shoring of the entire floor above during the swap. Best for: rotted wood beams, severely deflected girders.
Foundation Repair Underneath
If the sag traces back to foundation movement (settling piers, sinking footings, hydrostatic pressure issues), the fix has to start there. Helical piers, push piers, or new footings stabilize the foundation first. Floor leveling follows. Trying to level a floor without fixing a settling foundation is a temporary patch that always fails.
Crawl Space Moisture Remediation
When joist damage comes from chronic moisture, repair isn’t complete without solving the environment. Vapor barriers, encapsulation, drainage correction, and dehumidification protect the new framing from repeating the same failure. This is where waterproofing, crawl space repair, and structural work overlap, and why it matters to hire one contractor who handles all of it rather than three who blame each other.
Subfloor and Finish Replacement
The last step, never the first. Once the structure is sound and level, then you address the plywood, hardwood, tile, or carpet on top.
We’re going to be straight with you here: anyone giving you a firm price on sagging-floor repair without seeing the home is guessing. That said, here’s the honest range and what moves the number.
Typical homeowner investment ranges:
- Minor sistering or localized joist reinforcement: $1,500 to $4,500
- Adding mid-span beam and posts in an accessible basement: $3,500 to $8,500
- Crawl space structural support with adjustable columns: $4,000 to $12,000
- Beam or girder replacement: $7,000 to $20,000+
- Foundation repair with floor leveling: $10,000 to $40,000+, depending on scope
What drives the price up:
- Access difficulty (finished basement, low crawl space, no exterior entry)
- Length of span being supported
- Need for engineering reports or permits
- Presence of moisture damage requiring remediation first
- Cosmetic restoration above (drywall, flooring, tile, paint)
- Lifting that has to be done slowly across weeks to protect finishes
- Whether helical piers or push piers are required for foundation stabilization
What you should not skimp on:
- A proper structural inspection (often $300 to $800, sometimes credited toward repair)
- Engineered drawings if walls were previously removed
- Permits, when required by your jurisdiction
- A contractor who carries proper insurance and offers a transferable warranty
A repair that looks cheap on paper but skips the diagnosis often costs three times more two years later when the floor sags again or insurance won’t pay because no permit was pulled.

How to Prevent Sagging Floors from Getting Worse
If you’ve already fixed the issue, or you’re in a home where it hasn’t happened yet, here’s how you protect the investment.
Keep crawl spaces and basements dry. Most joist rot starts with chronic humidity above 60%. A vapor barrier, proper drainage, and a quality dehumidifier are cheaper than reframing a floor.
Don’t ignore small leaks. A plumbing drip behind a wall or a slow roof leak can weaken joists for years before you see the floor move.
Annual termite inspections. In most of the U.S., termites cause more structural damage than fires and floods combined. An annual inspection is a small price for the peace of mind.
Think before you remodel. Heavy tubs, large fish tanks, dense bookshelves, and home gyms add real load. Ask a contractor whether the existing floor can carry it before you install it.
Document baseline measurements. Lay a level across key floors when you move in. Repeat every couple of years. If nothing changes, you have proof the structure is stable. If something changes, you catch it early.
Never let a contractor remove a wall without engineering. “We think it’s not load bearing” is not a structural analysis.
When to Call a Professional
You should schedule a structural inspection if you’re seeing any combination of:
- A measurable dip of 1/2 inch or more across a room
- A sag that’s visibly worse than it was a year ago
- New cracks in walls or ceilings near the sagging area
- Doors or windows that have started sticking or won’t latch
- Bouncing or spongy floors, especially near plumbing
- Musty smells, visible moisture, or mold in the basement or crawl space below
- A previous owner who “opened up” the floor plan
- Plans to remodel, add heavy fixtures, or sell the home
You should call us, or any qualified structural contractor, today if:
- The floor has changed measurably in the last few weeks
- You hear cracking or popping sounds from the framing
- The sag is over 1.5 inches
- You see active separation between walls, floors, or ceilings
Why Homeowners Trust Mold Removal Experts with Structural Repairs
Contractor-Owned, Not a Marketing Brand
Every Inspection Performed by a Certified Specialist Who’s Actually Held the Wrench
We’re a contractor-owned business, not a marketing brand that subs out the work. Every inspection is performed by a certified mold remediation specialist who’s actually held the wrench. We handle the full stack of moisture, structural, and crawl space work in-house, which matters because sagging floors almost always involve more than one trade.
- Years of Structural and Foundation Work in Long Island and Brooklyn
- 700+ Homes Stabilized, Sistered, Jacked, or Rebuilt
- Transferable Warranty on Structural Repairs
- Licensed, Bonded, Insured. Happy to Send Proof Before We Step on Your Property
- Free In-Home Structural Assessments With Written Findings
Why Is My Upstairs Floor Sagging? Final Thoughts
An upstairs floor rarely starts sagging for “no reason.” In most homes, the problem develops slowly from excess moisture, structural movement, weakened framing, overloaded spans, or years of unnoticed stress building beneath the surface. The longer the issue is ignored, the more expensive and invasive repairs usually become. What begins as a slight dip in the hallway can eventually affect walls, doors, windows, flooring, plumbing lines, and even the structural stability of the home itself.
The good news is that sagging floors are often repairable when the underlying cause is identified early. Whether the issue comes from crawl space moisture, undersized joists, foundation settlement, wood rot, or aging structural materials, a proper inspection gives you a clear path forward before damage spreads further. If you’ve noticed new unevenness, bouncing, cracking, or movement upstairs, it’s worth having the structure evaluated now rather than waiting for visible failure later.
Schedule Your Free Structural Assessment
Is a sagging upstairs floor dangerous?
It depends on severity and rate of change. A small, stable dip in an older home is rarely dangerous. A dip that’s growing month to month, accompanied by new cracks, sticking doors, or audible cracking sounds, can indicate active structural failure and warrants immediate inspection. The rate of change matters more than the absolute measurement.
Can a sagging upstairs floor be fixed?
Yes, almost always. The question isn’t whether it can be fixed. It’s what’s causing it and how invasive the fix needs to be. Localized joist weakness can often be repaired in a day or two through sistering. Failed central beams, foundation movement, or large-area sag take longer and cost more, but the structural fix is well-understood and reliable when done correctly.
How much does it cost to fix a sagging floor upstairs?
Most homeowners invest between $3,500 and $12,000 to address a moderate sag, depending on cause and accessibility. Localized joist repair sits at the low end. Repairs involving central beam replacement, foundation stabilization, or extensive cosmetic restoration sit at the high end. Get at least two written diagnoses before committing.
Will homeowners insurance cover a sagging floor?
Usually no. Most policies exclude “wear and tear,” settlement, and gradual damage, which is what sagging floors typically are. There are exceptions: damage from a covered event (a burst pipe that rotted joists, for example, or a fallen tree) may be partially covered. Always document the cause carefully and file the claim before starting repairs.
Should I level the floor before installing new flooring?
Yes, but only after you’ve confirmed the structure underneath is sound. Installing new hardwood or tile over a still-deflecting floor system means cracked grout, gapping boards, and a do-over within a few years. Diagnose first, repair the structure second, level the subfloor third, then install your finish flooring.
Why does my upstairs floor bounce?
Bounce, which engineers call “vibration” or “live load deflection,” usually means the joists are within code for strength but undersized for stiffness. You feel it most under footsteps or when furniture is dropped. The fix is adding mid-span support, sistering, or installing blocking and strapping to stiffen the floor system. Bounce isn’t always dangerous, but it’s a sign the floor is working harder than it should be.
Can penicillium mold grow behind walls without visible signs?
Yes. Penicillium frequently grows behind drywall, under flooring, or inside wall cavities after leaks or flooding, even when surfaces appear dry.
Does cleaning visible mold remove penicillium completely?
Surface cleaning may remove visible staining, but it does not eliminate hidden growth, airborne spores, or the underlying moisture source causing the problem.
What health symptoms are commonly linked to penicillium mold exposure?
Symptoms may include nasal congestion, coughing, throat or eye irritation, headaches, fatigue, or worsening allergy and asthma symptoms in sensitive individuals.
Can I fix a sagging floor myself?
Cosmetic patches (shimming a piece of furniture, leveling a small area before tile) sure. Structural repair, no. Diagnosing load paths, sizing replacement members, and safely lifting a settled floor requires equipment, code knowledge, and experience that protects both your home and the people in it. A wrong jack point can crack a foundation wall. A wrong support sizing can mask the problem while it gets worse. This is one to hire out.