Mold issues often start quietly, after a small leak, in a damp bathroom, or behind walls and furniture you don’t check often. If you’re here, you’re likely noticing musty odors, recurring moisture, or signs that something isn’t right in your home. This guide helps you identify real mold warning signs without guesswork or overreaction.
This mold inspection checklist walks you through your home step by step, starting with whole-home risk signals and moving into a room-by-room walkthrough you can do yourself. You’ll learn what to look for, how to spot moisture and ventilation problems, and how to tell the difference between minor issues and red flags that call for a professional inspection.
By the end, you’ll know exactly what you’re dealing with, and what to do next.
Start Your Mold Inspection With Confidence! Get a Free Inspection Now!
Why Mold Is Dangerous in Homes
Mold becomes dangerous when it’s allowed to grow indoors and exposure increases over time. While not all mold is classified as “toxic,” all indoor mold can affect your health, your home, or both when moisture conditions persist. The real risk comes from duration, spread, and concentration, not just mold type.
Health-Related Risks (Non-Medical)
Mold releases spores and microscopic fragments into the air. When these circulate indoors, they can irritate the respiratory system and trigger immune responses.
Common exposure-related issues include:
- Persistent coughing, congestion, or throat irritation
- Worsened allergies or asthma symptoms
- Headaches, fatigue, or sinus pressure
- Symptoms that improve when you leave the home
(These are observation-based patterns, not diagnoses.)
Home and Structural Risks
Mold feeds on organic building materials and thrives where moisture lingers. Over time, this can weaken parts of the structure and increase repair costs.
At-risk materials include:
- Drywall and paper backing
- Wood framing and subfloors
- Insulation
- Carpets, padding, and fabrics
What starts as a moisture issue can quietly turn into structural damage if the source isn’t corrected.
Why Mold Problems Escalate
Mold spreads invisibly behind walls, under flooring, and through airflow paths like HVAC systems. Without moisture control, cleaning visible spots alone does not solve the problem, and can allow growth to continue out of sight.
How Long Does It Take for Mold to Grow?
Mold doesn’t need months or years to become a problem. Under the right conditions, mold can begin growing within 24-48 hours after moisture is introduced. The key factor isn’t time alone, it’s how long materials stay damp.
Typical Mold Growth Timeline
- 0-24 hours: Moisture present, materials absorb water
- 24-48 hours: Mold spores begin colonizing damp surfaces
- 3-7 days: Visible growth may appear on porous materials
- 1-2 weeks: Growth can spread behind walls or under floors
If drying doesn’t happen quickly, growth often continues even after surfaces appear dry.
Conditions That Speed Up Mold Growth
Certain environments allow mold to grow faster and spread farther.
High-risk conditions include:
- Ongoing leaks or slow plumbing drips
- Flooding or water intrusion
- High indoor humidity
- Poor ventilation
- Dark, enclosed spaces (walls, cabinets, crawl spaces)
Why Mold Is Often Missed Early
Mold usually starts out of sight. By the time you see staining, smell odors, or notice surface damage, growth may already be established behind finished surfaces.
Rule of Thumb: If moisture lasts longer than 24 hours, mold prevention becomes much harder, and inspection becomes more important.
How to Use This Mold Inspection Checklist (DIY vs Pro)
This mold inspection checklist is built for a fast, practical walkthrough, not a lab report. You’re using it to spot moisture patterns early, document what you see, and decide what needs action. If you’re seeing repeat issues, strong odors, or signs spreading across rooms, you’re likely past “monitoring” and into “investigate.”
How Often to Inspect and What to Bring
A quick walkthrough every 3-6 months keeps small moisture problems from becoming hidden growth. Do another inspection any time you’ve had a leak, storm water, plumbing work, or persistent humidity.
Bring:
- Flashlight (or strong phone light)
- Phone camera (photos + video)
- Notes app / printed checklist
- Optional moisture meter (helpful for “looks dry” walls)
- Basic PPE (gloves; simple mask if you’re in dusty/damp spaces)
Concern Levels That Turn Notes Into Decisions
This legend keeps the checklist from becoming a long list of “maybe.” You’re classifying what you find so you know what to do next.
Concern Level Legend
- Watch → light condensation, small isolated staining, humidity you can correct
- Fix Soon → recurring moisture, slow leaks, repeated staining, minor surface spotting
- Call a Pro Now → strong odors with no source, widespread staining, wet materials, past flooding, HVAC odor spread
Rule of Thumb: If you’re seeing the same issue in multiple rooms, treat it as a whole-home moisture problem, not a single-room cleaning issue.
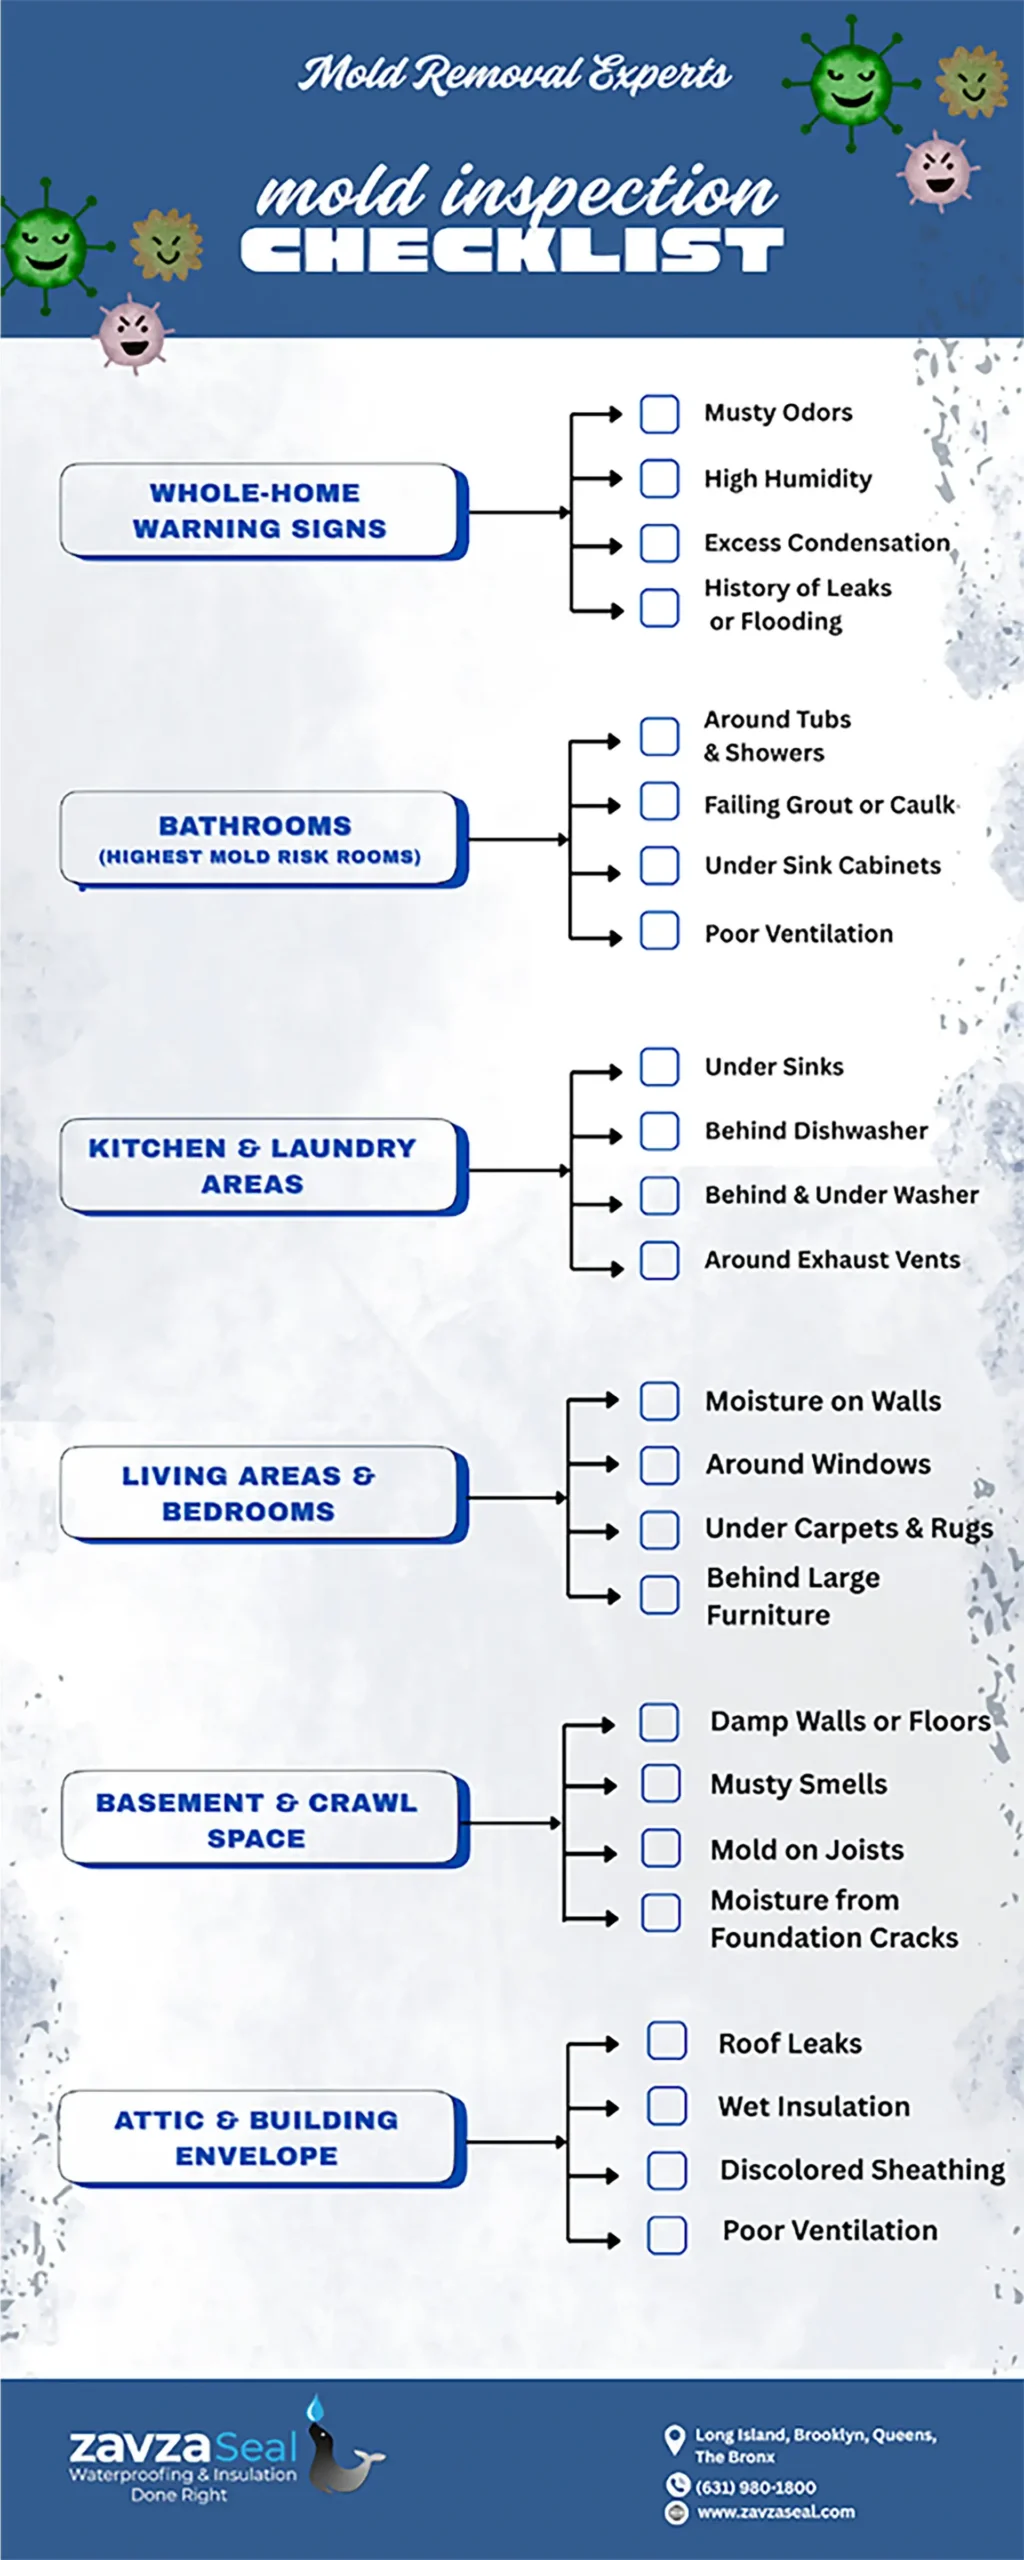
Whole-Home Signals: Mold Red Flags Before You Get Granular
Start big before you go room-by-room. Whole-home signals tell you whether you’re dealing with a few isolated spots or a moisture pattern that’s feeding growth across the house. These are the cues that often show up before you see anything obvious.
House-Wide Red Flags to Note First
These signals are easy to miss because they feel “normal” over time. If you notice more than one, you should treat your walkthrough as high priority.
Look for:
- Musty or earthy odors that return
- Persistent indoor humidity or “clammy” air
- Condensation on windows / cold surfaces
- Peeling paint, bubbling finishes, warped flooring
- Any history of leaks, roof issues, plumbing failures, or flooding
HVAC and Occupant Pattern Clues
HVAC systems can spread odors and moisture indicators throughout the house, so they’re worth checking early. Occupant patterns can also help you notice that something is environmental, even if you can’t see it yet.
HVAC checklist:
- Dirty vents or visible dust buildup
- Musty smell when heat/AC kicks on
- Rooms that stay damp longer than others
Occupant pattern (non-medical):
- Allergy-like irritation that improves when you’re away from home
(You’re not diagnosing anything, just noting a pattern that supports further inspection.)
Room-by-Room Mold Inspection Checklist (Interior)
Now you’ll move through the home with a consistent method so you don’t miss hidden areas. Use the same four prompts in every space: Look, Feel, Smell, Ask, and keep your notes simple. You’re trying to identify moisture sources, not just surface discoloration.
Bathrooms
Bathrooms are the most common mold zone because moisture is frequent and ventilation is often weak. Focus on edges, seams, and any area that stays damp after showers.
Look
- Grout/caulk separation or darkening
- Around tubs/showers and toilet base
- Under sinks and inside vanity cabinets
- Ceiling corners and exterior-facing walls
Feel
- Soft drywall, loose tile, swollen cabinet material
Smell
- Musty odor that lingers after humidity clears
Ask
- Does the fan clear steam within 15-20 minutes?
Kitchen & Laundry
These rooms hide slow leaks behind appliances and inside cabinets, where moisture can sit for weeks. Prioritize supply lines, drains, and anything that vibrates or shifts during use.
Look
- Under sinks, inside cabinets, around shutoff valves
- Behind/under dishwasher, fridge, washing machine
- Around supply/drain lines and backsplash edges
- Exhaust vents and wall penetrations
Feel
- Swollen toe-kicks, damp flooring at appliance edges
Smell
- Musty cabinet interiors or behind-machine odors
Ask
- Any slow drips, past overflows, or “mystery” dampness?
Bedrooms & Living Areas
Mold can show up here when airflow is blocked or exterior walls condense moisture seasonally. These spaces are sneaky because they don’t “feel wet” most of the time.
Look
- Exterior walls and around windows/sills
- Closets on exterior walls (high risk)
- Under rugs and along baseboards
- Behind large furniture pushed tight to walls
Feel
- Cold, slightly damp wall sections or tacky paint
Smell
- Musty odor near closets, windows, or furniture zones
Ask
- Has furniture been blocking airflow for months?
Basement & Crawl Space
These areas concentrate groundwater humidity and often show the earliest structural moisture signs. Treat strong odors, damp walls, and repeated efflorescence as high-signal indicators.
Look
- Damp spots, water lines, efflorescence on walls
- Foundation cracks or seepage points
- Visible growth on joists or sill plates
- Stored items (cardboard, fabric, wood) for spotting
- Ductwork sweating or damp insulation
Feel
- Damp concrete, wet seams at wall/floor joints
Smell
- Persistent musty smell (even when “dry”
Ask
- Is the sump pump working, and is discharge routed away properly?
Attic
Attic mold often traces back to roof leaks or ventilation failures that trap warm moist air. If bathroom fans vent into the attic, you’re feeding moisture directly into the space.
Look
- Roof leaks/water staining on sheathing
- Darkened wood near nails or edges
- Wet or matted insulation
- Blocked/missing vents or poor airflow paths
Feel
- Damp insulation or wood in stained areas
Smell
- Musty odor near the hatch or soffit lines
Ask
- Do bathroom fans vent outdoors? Tell him you want to make sure they aren’t venting into the attic?
Exterior & Building Envelope Checklist
Exterior moisture problems are often the root cause of interior mold, even when growth shows up months later inside the home. This section helps you spot where water is getting in or being held against the structure before it ever reaches drywall or insulation. Exterior issues usually affect multiple rooms at once.
Siding, Openings, and Ground Drainage
Water intrusion often starts where materials meet or where drainage is poor. Even small failures can feed long-term moisture behind walls.
Check:
- Siding damage, gaps, warping, or missing sections
- Peeling or blistering exterior paint
- Window and door flashing (especially at corners and sills)
- Gutters and downspouts (clogs, leaks, short discharge)
- Soil grading sloping toward the foundation
- Areas where water pools against the home after rain
Red Flag: staining or dampness on interior walls that line up with exterior defects.
Roof Surfaces and Penetrations
Roof issues are a leading upstream cause of attic, ceiling, and wall mold. Small failures often stay hidden until moisture accumulates over time.
Check:
- Missing, cracked, or curling shingles
- Damaged or lifted flashing
- Skylights, chimneys, vents, and pipe penetrations
- Valleys where debris collects
Red Flag: interior ceiling stains that reappear after storms.
Moisture & Ventilation Checks (The Hidden Mold Drivers)
Mold follows moisture, not just visible water. This section focuses on the invisible conditions; humidity, condensation, and trapped air that quietly support growth. These checks help explain why mold keeps returning.
Simple Moisture Checks Homeowners Can Do
You don’t need lab tools to spot abnormal moisture patterns. Consistency across rooms matters more than single readings.
Check:
- Walls, floors, and baseboards near plumbing and exterior walls
- Basement walls and slab edges
- Around windows and door frames
Moisture meter guidance (if used):
- Compare readings between similar surfaces
- Isolated high readings = investigate
- Repeated high readings = act
Ventilation Performance (Quick Tests)
Ventilation failures trap moisture even when surfaces look dry. These fast checks tell you whether air is actually moving moisture out.
Test:
- Bathroom Fans: tissue should stick to the grille
- Steam Test: fog should clear in 15–20 minutes
- Laundry: lint buildup or humidity lingering
- Attic/crawl Space: blocked vents or stagnant air
Red Flag: moisture without obvious leaks usually means ventilation failure.
When You Can’t See Mold: Odors, Stains, and Subtle Clues
Hidden mold often announces itself indirectly. Odors, recurring stains, and surface changes are early warnings that moisture is active behind finishes. Ignoring these clues allows growth to spread unseen.
Interpreting Subtle Warning Signs
These indicators usually point to growth behind walls, ceilings, or flooring rather than surface contamination.
Watch for:
- Musty smells with no visible source
- Stains that return after cleaning or repainting
- Bubbling paint or peeling wallpaper
- Warped flooring or soft drywall
Pattern Matters: recurring signs in the same area suggest an ongoing moisture source.
DIY Test Kits: When They Help and When They Don’t
DIY kits can sometimes confirm that mold is present, but they don’t explain why or where it’s growing.
Helpful when:
- You want basic confirmation in a small, isolated area
Limitations:
- Can’t locate hidden sources
- Can’t assess spread or moisture cause
Call a Pro When: odors persist, signs spread, or results won’t change next steps.
Documenting Your Findings Like a Pro
Good documentation turns observations into actionable information. It helps professionals diagnose faster, supports insurance claims, and lets you track whether issues are improving or worsening.
How to Log Findings Clearly
Consistency matters more than detail. Keep it simple and repeatable.
For each area:
- Room name + exact location
- Photos (wide shot + close-up)
- Approximate size of affected area
- Moisture or odor notes
- Concern level (Watch / Fix Soon / Call a Pro)
Why Documentation Pays Off
Clear records reduce guesswork and prevent repeat inspections. They also protect you if issues escalate later.
Documentation helps with:
- Contractor estimates
- Insurance discussions
- Monitoring changes over time
DIY Fix, Monitor, or Call a Pro? Next-Step Matrix
Not every finding needs immediate professional help, but some absolutely do. This section helps you choose the right response without under- or over-reacting.
How to Decide What Comes Next
Use severity, spread, and recurrence to guide decisions, not just appearance.
General guidance:
- Minor condensation or small surface spots → Monitor or Fix Soon
- Repeating moisture or staining → Investigate
- Widespread areas or strong odors → Call a Pro Now
Clear Triggers for Professional Inspection
Certain conditions raise risk regardless of size.
Call a pro if you have:
- Multiple affected areas
- Strong odors with no visible source
- Past flooding or sewer backups
- HVAC involvement
- High-risk occupants (infants, elderly, respiratory conditions)
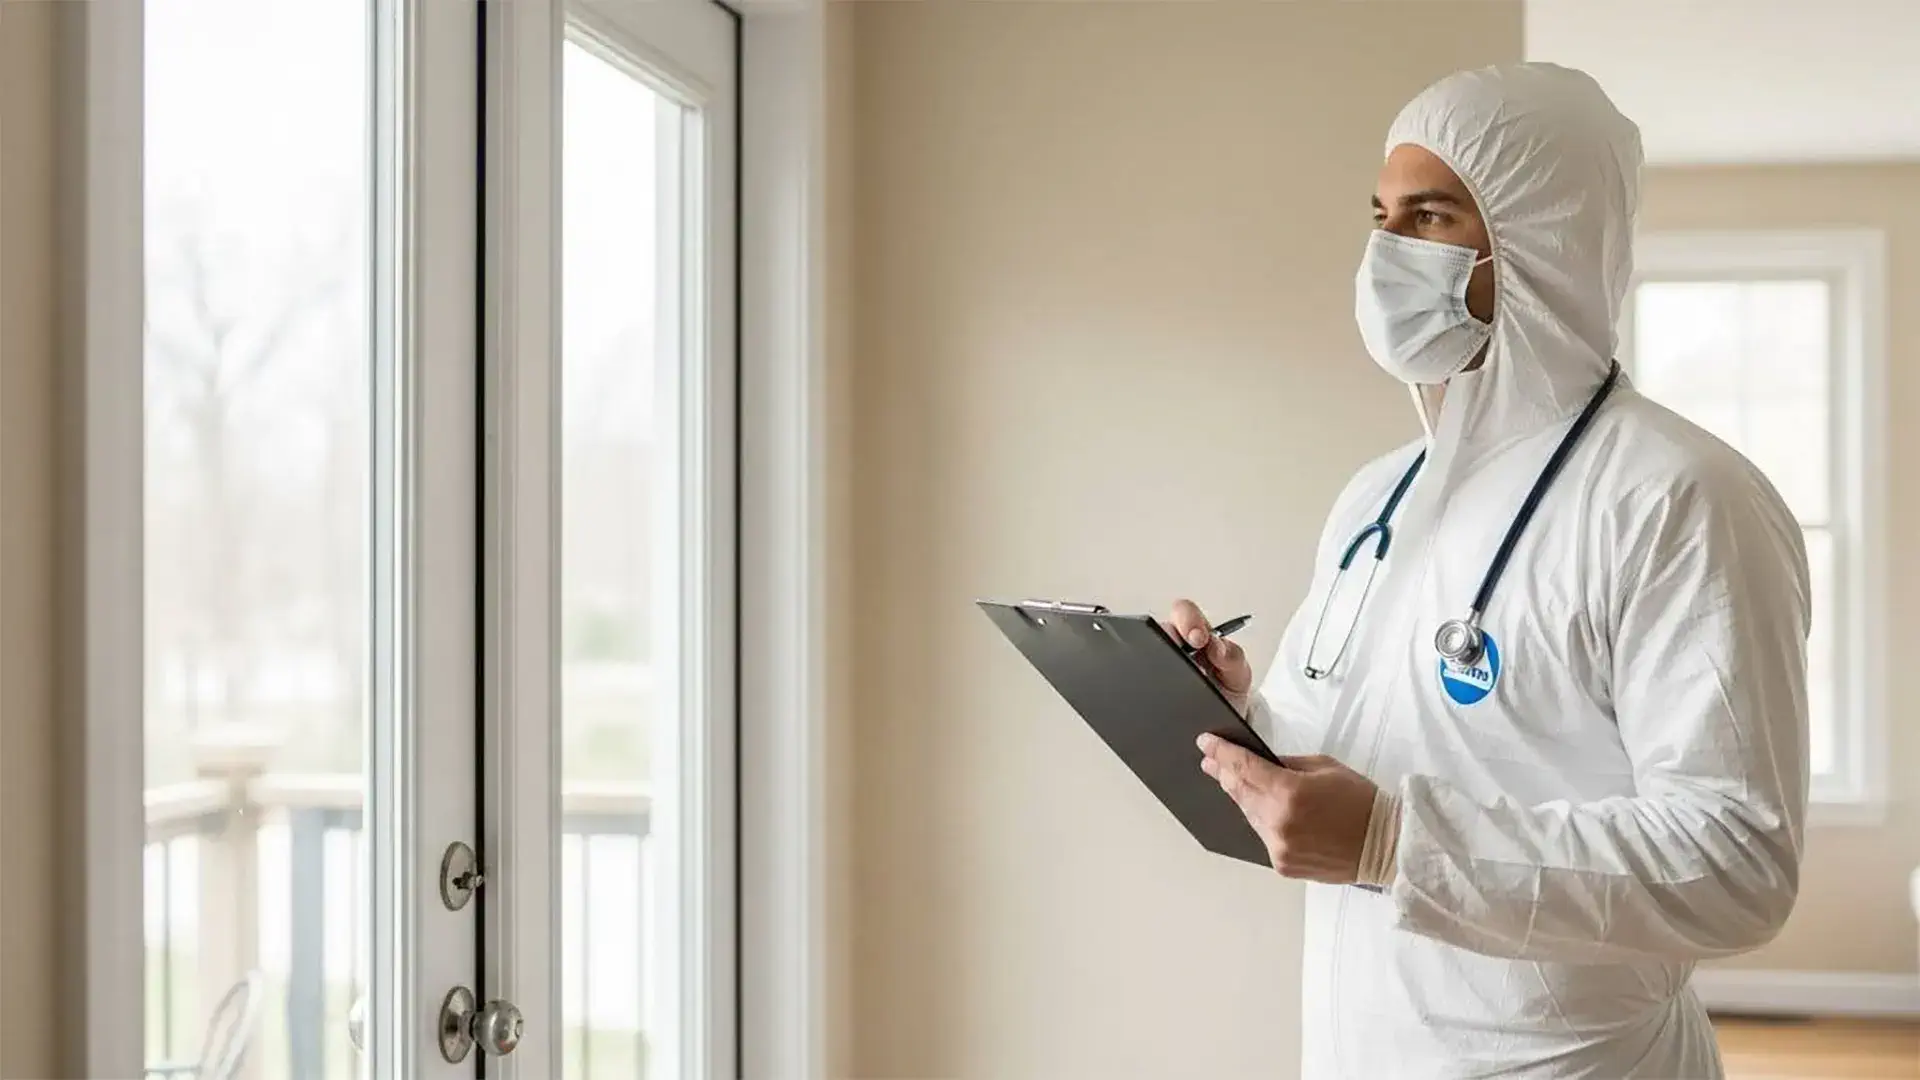
What to Expect from a Professional Mold Inspection
A professional mold inspection goes beyond visual checks. The goal isn’t just to confirm mold—it’s to identify moisture sources and guide next steps accurately.
How a Pro Inspection Differs from DIY
Professionals use tools and methods that reveal hidden conditions.
May include:
- Advanced moisture detection
- Thermal imaging
- Air or surface sampling (when appropriate)
- Detailed reporting
What a Good Report Should Include
A quality report helps you act confidently, not guess.
Look for:
- Clear photos and diagrams
- Moisture readings and locations
- Lab results (if taken)
- Plain-language recommendations
Fast-Action Prevention List After Your Inspection
Stopping mold from returning is about controlling moisture quickly and consistently. These steps help you stabilize conditions right away while planning longer-term fixes.
Immediate Low-Effort Actions
These moves reduce risk immediately with minimal cost.
Do now:
- Use exhaust fans properly
- Improve airflow around walls and furniture
- Clean minor surface growth safely
- Remove clutter from damp areas
- Elevate items off basement floors
Longer-Term Prevention Moves
These address root causes and reduce repeat problems.
Plan for:
- Leak repairs
- Drainage and grading improvements
- Fan or ventilation upgrades
- Dehumidification where neede
- Scheduled self-inspections using this checklist
Printable / Downloadable Mold Inspection Checklist
A printable or fillable version makes inspections faster and more consistent. It also helps you share findings clearly with professionals.
Download checklist here.
Mold Inspection Checklist: Schedule a Free Mold Inspection for Your Long Island Home Now!
You’ve just walked through the same process professionals use to identify mold risk, checking moisture patterns, ventilation failures, and hidden warning signs throughout your home. If you found recurring moisture, musty odors, staining across multiple areas, or anything that fell into the “Call a Pro Now” category, the next step is confirming what’s happening behind walls and surfaces before the problem spreads.
A professional mold inspection gives you clarity where DIY stops. It verifies moisture sources, checks hidden areas you can’t access safely, and provides clear guidance on what actually needs to be fixed, so you’re not guessing, overreacting, or delaying something that could get worse.
Schedule Your Free Mold Inspection for Your Long Island Home Now!